Map Page Settings
The Map Page Settings dialog box is a central place where you can set various options for map pages. You can go to Map > Map Page Settings from the Map Toolbar to set the map page options.
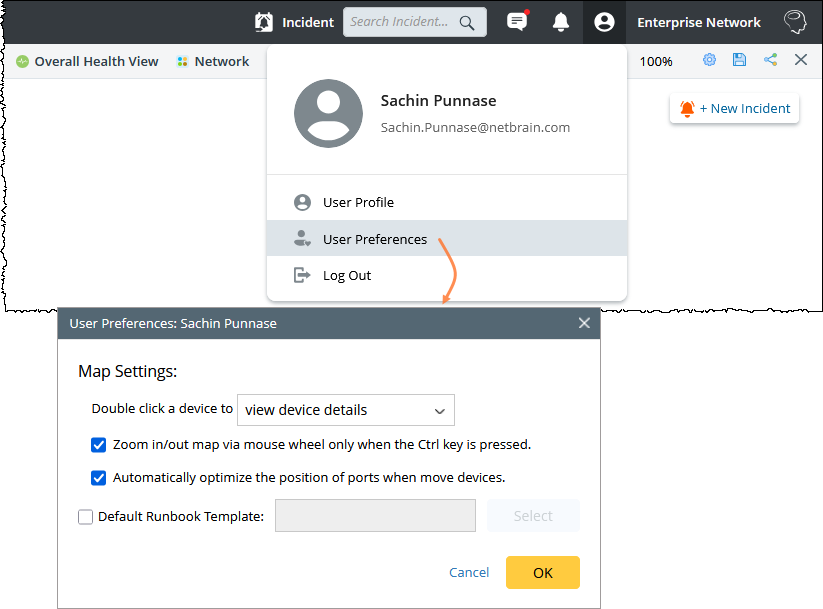
User Preferences
To access these settings, click your profile icon and select User Preferences from the dropdown menu.
In the User Preferences panel, you can configure how the map behaves during interaction. You can:
- Double-click behavior: Choose what happens when you double-click a device—for example, display device details.
-
Zoom control: Enable zooming with the mouse wheel only when the Ctrl key is pressed.
-
Port layout optimization: Automatically adjust the position of ports when moving devices on the map.
- Default Runbook Template: Select a default runbook template to apply when creating new runbooks.
Map Page Settings Attributes
The Map Page Settings section includes the following configurable attributes:
| Area | Content | Explanation | |
| View Options for Data Unit | Data Unit | Includes device hostname, interface name, Device Note and the following:
| |
| Display Ratio | Indicates the threshold of zoom controls for displaying a corresponding data unit on a map. | ||
| Zoom Step | Indicates the zoom controls changed by each zoom-in or zoom-out action. See Browse Device Data on Map for more details. | ||
| Hide media connected with two topology links only | Hide the media with only two topology links in total in the database, not the media with only two topology links drawn on the map. | ||
| Interactive & Backend Auto Link Settings | Default Auto Link:
| See Topology Type for details. | |
Link Option Between Two Devices:
| Excludes management links from the map while using the auto-link function.
| ||
Extend Links
| Defines how many links are automatically drawn between devices. | ||
Auto Link after Update Map
| Auto-link all devices after the map is updated | ||
| Apply to Other Maps | Enables applying the auto link setting to existing maps/map pages | ||
| Device View on Expanded Style |  | One device type that is suitable for a Layer 2 topology. You can point to a port or click a link to view its detailed information. | |
| Interface Highlight Mode | Highlight Link & Port | Highlight both links and ports. | |
| Only Highlight Link | Highlight link. | ||
| Only Highlight Port | Highlight port. | ||
| Enable Tip Window of Switch Port | Enable Tip Window of Switch Port | Set to give tips for the switch port. | |
| Hide the Author and Time in the Note | Hide the Author and Time in the Note | Set to make the Author and Time invisible in the Note. | |
| Map Background Color |
| Set the background color for a map. |
 under a device icon on a map.

|
Note: For some map page settings, you can check Set as Default to keep the current settings as the default settings. |
|
|
Note: For some map page settings, you can apply the setting to other maps. Click Apply to Other Maps, then click one of the three map categories (Common Map, Device Group Map, Site Map) to select the maps to apply the setting. 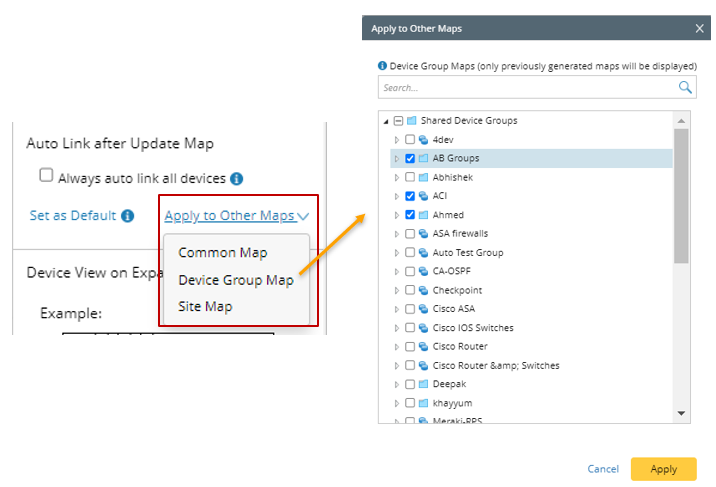 |
See Also: