Creating User Accounts

Contents
To manually create a user account, complete the following steps:
1.Log in to the System Management page.
2.In the System Management page, select the User Accounts tab. The available user accounts are displayed in the Existing User List.
3.Click Add at the upper-left corner, and configure the following. This is an example:
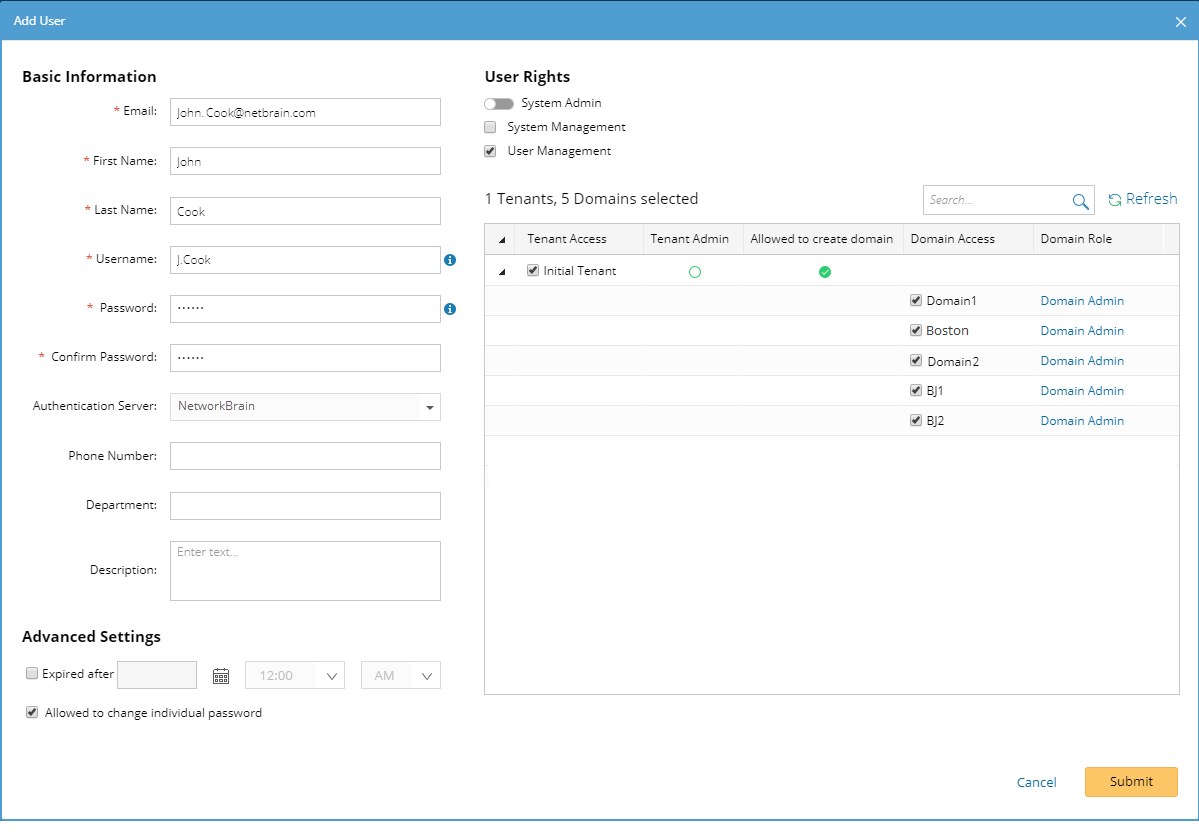
1)Enter basic information. The fields marked with asterisks are mandatory.
▪Email — enter a valid email address, case-insensitive.
▪Username — enter a unique name in the system, case-insensitive. It cannot be modified once created.
▪Password — enter a password for the username. See Configuring Password Policy for more information.
▪Authentication Server — keep the default option NetworkBrain for manually added user accounts.
2)Assign user rights, including tenant and domain access permission and management role.
▪System Admin — click to assign the system administrator role to the user.
Tip: System administrator has the privileges of both system management and user management.
oSystem Management — select the check box to assign the corresponding privileges of system management to the user. See Featured Management Privileges for more details.
oUser Management — select the check box to assign the corresponding privileges of user management to the user. See Featured Management Privileges for more details.
▪Tenant Access — select one or more tenants to assign the access permission to the user.
▪Tenant Admin — select one or more tenants to assign the tenant administrator role to the user.
oAllowed to Create Domain — select the check box to assign the domain creation permission of the selected tenant to the user.
oDomain Access — select one or more domains to assign the access permission to the user.
oDomain Role — assign the admin role of the accessible domains to the user. By default, the Domain Admin role is assigned.
3)Configure advanced settings if required, including account expiration and privilege to modify/reset password.
▪Expired after — select the check box and specify a time point after which the user account will expire.
Tip: When the validity time is reached, the user cannot log in to the system anymore and the status displays as Expired. If the field is not configured via external authentication, the status displays as Unavailable.
▪Allowed to change individual password — select the check box to enable the user to reset or change his or her password.
4.Click Submit. The user account will be added to the Existing User List.
A successful notification email will be sent to the mailbox of the newly created user if the email server is configured.
Changing Password for an Existing User
To change the password for a user whose account was manually created in the system when he or she forgets the password:
1.Point to the user entry from the Existing User List, and click Change Password in the Password column.
2.Enter the new password twice, and then click Save.
Tip: To enable the change password function for system user accounts which were imported from third-party authentication servers, you can manually change its authentication type from External to NetworkBrain.
See also:
▪Configured Email Server Settings