Configuring SSO Authentication
1.Log into System Management page.
2.In the System Management page, click User Accounts > External Authentication.
3.Click the ![]() icon and select Add SSO Authentication from the drop-down list.
icon and select Add SSO Authentication from the drop-down list.

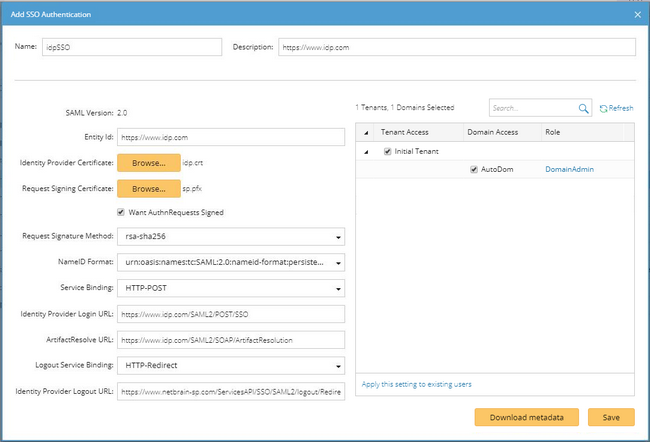
1)Enter a unique name to identify the SSO server and a brief description.
Note: Space is not allowed in the SSO name, and you can remove it or replace it with "-" or "_".
2)Enter the credentials to connect to the SSO server. See SSO Settings for more details.

3)Assign domain access permissions and more privileges to the users on the SSO server.
▪Tenant Access — select one or more tenants to assign the access permissions to all users on the SSO server.
Tip: The accessible tenants can be modified on the Users tab after the users are synchronized.
▪Domain Access — select one or more domains under an accessible tenant to assign the access permissions to all users on the SSO server.
▪Role — click Assign Roles to assign more domain privileges to all users by role on the SSO server. See Share Policy for more details.
Tip: If all the built-in role can't satisfy your requirement, click Add Role to create one. See Adding a role for more details.
4)To apply the privilege settings to all existing users on the SSO server, click Apply this setting to existing users. Click Yes in the Confirmation dialog box.
5)Click Save to commit the settings.
Tip: You can click Download metadata to download the SAML metadata of NetBrain Service Provider, which contains entityID, endpoints (Attribute Consume Service Endpoint, Single Logout Service Endpoint), public X.509 certificate, nameID format, organization information, and so on.
6)By default, the authentication configuration is enabled. To disable it, clear the Enable check box on the External Authentication tab.
After the connection is successfully verified, the users on the SSO server can directly log into the system with the assigned roles and privileges by logging into the corresponding Identity Provider first. They will be automatically synchronized under the Users tab after the login. And when the users log out of the Identity Provider, they will also log out of the system automatically.
SSO Server Settings
The following table lists the credentials that are required when connecting to an SSO server.
Field |
Description |
|---|---|
SAML Version |
The version of SAML your Identity Provider uses. Currently, SAML 2.0 is supported. |
Entity Id |
The unique identifier of the Identity Provider. |
Identity Provider Certificate |
The X.509 certificate containing the public key used by the system to verify the SAML 2.0 messages signed by the Identity Provider, such as the Assertion and LogoutRequest/LogoutResponse. Click Browse to upload the certificate. Note: Only the .crt format certificate is supported. |
Request Signing Certificate |
The X.509 certificate containing the public key and private key used by the system to sign outgoing SAML 2.0 messages and decrypt incoming SAML 2.0 messages encrypted by the Identity Provider, such as the Assertion/NameID/Attribute elements inside an SSO Response. Click Browse to upload the certificate. Note: Only the .pfx format certificate is supported. Besides, the certificate protected with a password is not supported. |
Want AuthnRequests Signed |
Set whether to sign the SAML authentication request with NetBrain certificate. Note: Select the check box if your Identify Provider enables the certificate signature for received messages through the security settings. |
Request Signature Method |
The signing algorithm to encrypt the messages sent to the Identity Provider. The available options include: ▪rsa-sha1 ▪rsa-sha256 ▪rsa-sha384 ▪rsa-sha512 |
NameID Format |
The name identifier formats supported by the Identity Provider. Name identifiers are a way for providers to communicate with each other regarding a user. Single sign-on interactions support the following types of identifiers: ▪urn:oasis:names:tc:SAML:2.0:nameid-format:persistent ▪urn:oasis:names:tc:SAML:1.1:nameid-format:unspecified ▪urn:oasis:names:tc:SAML:1.1:nameid-format:emailAddress |
Service Binding |
The binding used to send the login request to the Identity Provider. The available options include: ▪HTTP-Redirect ▪HTTP-POST |
Identity Provider Login URL |
The Login Service URL where the Identity Provider will redirect the user during the login exchange. |
ArtifactResolve URL |
The Artifact Resolution Service (ARS) URL to send back-channel requests to resolve artifacts received from NetBrain. |
Logout Service Binding |
The binding used to send the logout request to the Identity Provider. The available options include: ▪HTTP-Redirect ▪HTTP-POST |
Identity Provider Logout URL |
The Logout Service URL where the identity Provider will redirect the user during the Logout exchange. |
