Monitor Output

Contents
The Monitor Output analyzes and displays data periodically. The monitor results are displayed and refreshed periodically in specific positions on the map. You can also define alerts to output messages.
Note: When you extend a monitor output node in the workflow, this Qapp becomes a Monitor Qapp and will be saved in a .mapp format.
1.Click the Monitor Node in the Qapp Editor.
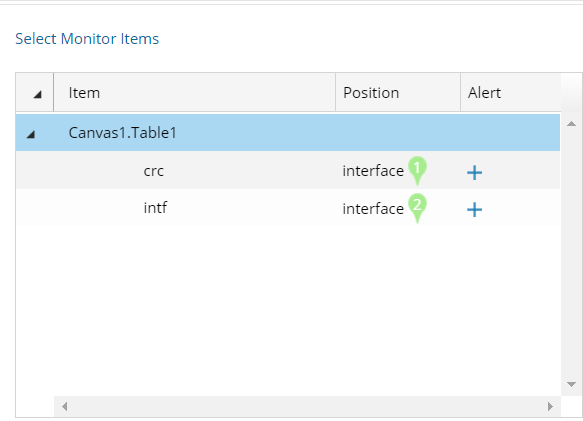
2.Click Select Monitor Items and the Select Monitor Item dialog opens.

1)Select a table in the left pane. 2)Check the variables you want to display on the map from the selected table. You can add device-level variables (such as CPU and memory) or interface-level variables (such as MTU and bandwidth). You can also select a table to monitor and display all variables in table format. 3)Click OK. |

1)Select a table in the left pane. 2)Select the device variable (_device by default) from the Device drop-down menu. 3)Select the interface key from the Interface drop-down menu. 4)Select an interface type, such as IPv4 Interface or IPv6 Interface, based on your actual network configuration. 5)Select the variables that you want to monitor under the Variable list. |
3.Set the recurring frequency at the upper-right corner. By default, the Monitor Qapp runs every two minutes.
4.Define Alert for monitor items.
Alert refers to notify users in various ways when an outage occurs, such as highlight the variable names on the map or prompt messages. Example: Define an alert condition for the variable $input_error (interface input error). 1)Click the 2)Select the analysis type to set conditions. The Alert will be triggered as soon as the conditions are met.
3)There are the following variables you need to know before setting conditions. The variables may differ depending on the analysis type you select. ▪[now] — the value of $input_error in the current loop. ▪[threshold] — an integer value. ▪[last] — the value of $input_error in the last loop. 4)Enter the text for output message when the alert is triggered. 5)Select the alert level. The difference between the two levels is only in the color and text display. |
|---|

5.Point to a monitor item, and then click the  icon to select Edit. The display setting interface may vary on different variable type.
▪Display Name — modify the display name on a map for the select variable. ▪Display Prefix — modify the display prefix on a map for the select variable ▪Value Unit — specify a unit for the variable on a map. ▪Display When — specify when to display the monitor item: oAlways display on map — default option, with no conditions. oOnly display when it triggers alert — the monitor item is only displayed when the alert is triggered. oDisplay when the condition is true — enter the customized conditions in the field. See Defining Alert for further operations. oNever display on map — applicable to the variables which are only for analysis at an intermediate stage and not intended to be displayed on the map. ▪Display More — specify more settings for digital value (not available for variables of string type): oShow increment/decrement on map — display the changes compared with the data in the last recurring period. oShow statistics on map — select whether to display the maximal, minimal or average value of the latest running data and further specify the execution times of Qapp for data statistics. |
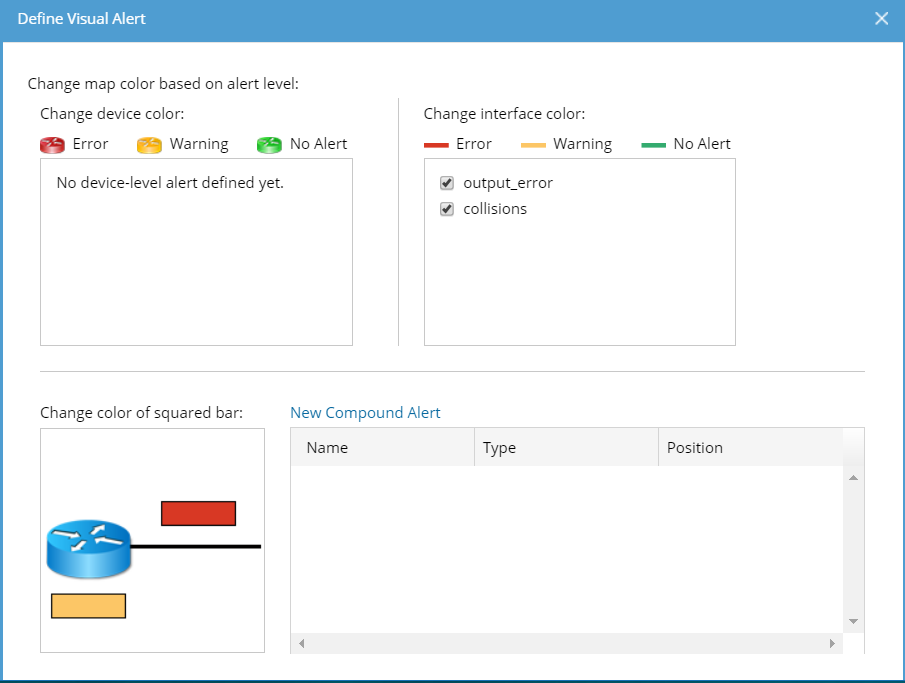
6.Customize the positions of each variable at the right side and define visual alerts based on your needs.
The visual alert refers to highlight devices or interfaces on the map when the specific alert of monitor items triggers. 1)Click Define Visual Alert and the following dialog prompts. The monitor items defined with alerts in step 4 are listed here. 2)Specify which variable change will cause the device or interface color change. You can select multiple variables. 3)If you want to set complex conditions to involve multiple variables, you can click New Compound Alert to define Compound Alert. a)Specify the Compound Alert type between Device and Interface. b)Set conditions for variables. See Defining Alert for more details. c)Enter the alert messages and select alert level. d)Click OK. 4)Repeat step 3) to add more Compound Alerts. 5)Click OK. 6)Select a position for compound alerts on a map. |
To utilize positions on the map more efficiently, you can merge monitor items within one category (device items or interface items). 1)Press the Shift or Ctrl key on your keyboard to select multiple monitor items and click the 2)Enter a new name for the newly merged items and click OK. 3)Select one position for the merged items. |
See also: