Installing Front Server
Note: Service Monitor Agent needs to be installed prior to installing Front Server. Refer to Installing Service Monitor Agent on Windows for more detailed steps.
Complete the following steps with administrative privileges.
1.Download the netbrain-frontserver-windows-x86_64-10.0a.zip file and save it in your local folder.
Tip: Contact NetBrain Support Team to get the download link.
2.Extract installation files from the netbrain-frontserver-windows-x86_64-10.0a.zip file.
3.Right-click the netbrain-frontserver-windows-x86_64-10.0a.exe file, and then select Run as administrator to start the Installation Wizard.
1)On the Welcome page, click Next.
2)On the System Configuration page, review the system configuration summary and click Next.
3)On the License Agreement page, read the license agreements, select the I have read the subscription EULA… check box and then click I ACCEPT.

4)On the Customer Information page, enter your company name, and then click Next.
5)On the Destination Location page, click Next to install the Front Server under the default directory C:\Program Files\NetBrain\. If you want to install it under another location, click Change.
6)On the Location of PostgreSQL data page, click Next to store the PostgreSQL data to the default directory C:\Program Files\NetBrain\PostgreData. If you want to restore it under another location, click Change.

Note: Make sure the designated data folder has more than 180GB free space.
7)On the Local Configuration page, set password and port for PostgreSQL database.

8)Review the summary of the current installation settings and click Install.
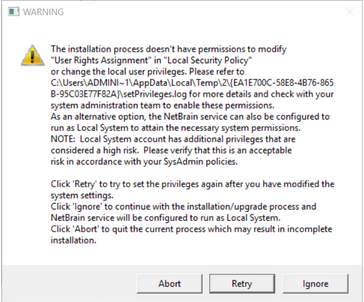
•(Optional) Ensure the NetBrain installation process using administrator account has the necessary permissions to modify “User Rights Assignment” in “Local Security Policy” or change the local user privileges. Otherwise, the following error message will prompt when installing each Windows component.

oClick Ignore to continue with installation/upgrade process and NetBrain service will be configured to run as Local System.
oIf you have security concerns, click Abort to quit the installation/upgrade process.
oClick Retry after you have modified the system settings.
Note: Local System accounts have additional privileges that are considered a high risk. Please verify that this is an acceptable risk in accordance with your SysAdmin policies.
Note: After clicking Abort, please check with your system administration team to enable the relevant permissions, uninstall the affected component(s) and reinstall. Contact NetBrain support team if you need any assistance during the process.
4.After the Front Server is successfully installed, click Finish to complete the installation process and exit the Installation Wizard. Close the pop-up registration program.
Note: The Front Server service will not be automatically started until the Front Server is added to a tenant and successfully registered. See Adding a Front Server to a Tenant and Registering the Front Server for more details.
5.To install more Front Servers for load balancing, repeat the above installation steps on separate machines.
See also:
▪Registering NetBrain Front Server on Windows
