Device Queue

Contents
Device Queue is the starting point within a Canvas, which is generated automatically when you create the Canvas node. It is essentially a table that stores the devices waiting for execution by a Qapp. The devices obtained by a Qapp and filtered via Filter Criteria will be passed to Device Queue at runtime. Therefore, whether a device can be loaded to the Device Queue node depends on the way that you set a Qapp to obtain devices at the Start node as well as the conditions that you have defined in the Filter Criteria.
A Qapp loops Device Queue row by row from top to bottom, and at each loop cycle, it reads devices in one row to retrieve data, analyze data and present analysis results. The Qapp will repeat the loop process until finishing all rows.
At this node, you can define the pattern to load input devices to the Device Queue:
▪Device — loads devices in a single device pattern and each device is an independent individual in the Device Queue.
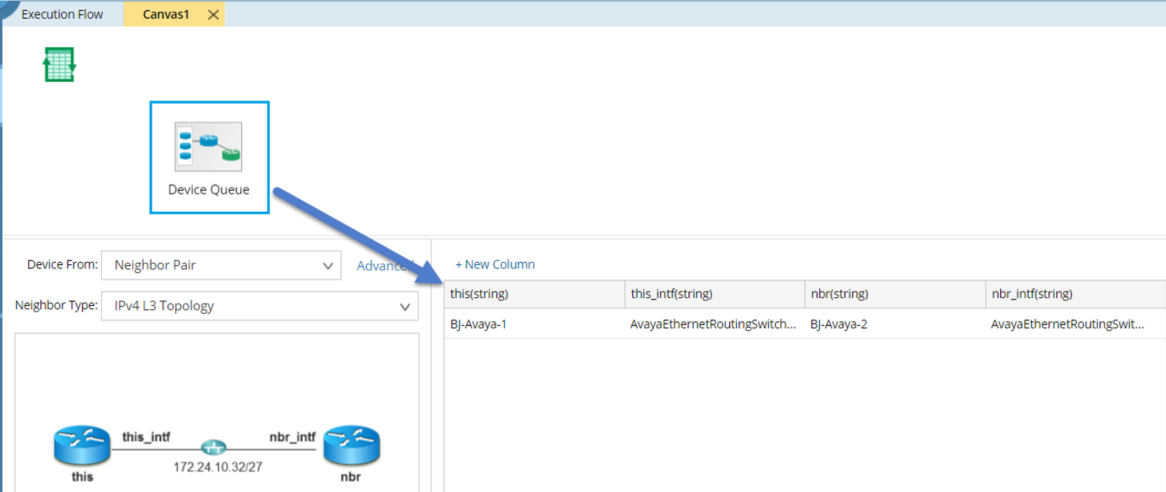
▪Neighbor Pair — loads devices in pairs and each pair is a pair of neighbor devices. This Device Queue pattern is often used to compare the difference of a device and its neighbor, such as MTU and Duplex mismatch.
▪Path — loads devices in hop pattern. Each hop contains a device, the incoming interface and outgoing interface. If you select the Calculated Path option at the Start node, the Path option here is selected by default.
▪Table — load devices from a specified table and the pattern to build devices depends on the definition of the imported table. If you select the Table option at the Start node, the Table option here is selected by default. The specific table you can select is defined in the Global Table.
Defining a Device Queue Node
1.Click the Device Queue node on the Canvas tab.
2.Select the device input from the Device Input drop-down list. There are four options as follows:

1)Click the drop-down menu of Device From and select Device. 2)Click Advanced to configure whether to include interface information in the device queue based on your needs. |
1)Click the drop-down menu of Device From and select Neighbor Pair. 2)Specify the type of neighbor pairs (such as this and nbr in the device queue table) from the Neighbor Type drop-down list. ▪IPV4/IPV6 L3 topology — includes each device and its Layer 3 neighbor devices. ▪L2 topology — includes each device and its Layer 2 neighbor devices. ▪Any combination — considers every two devices as neighbor pairs. If you select this option, you can skip the next step. 3)Click Advanced to configure the following options based on your needs. ▪logic to build device pair: oFilter visible neighbors by map — select the neighbor pairs which are displayed on the map. Note: This option only takes effect when you run the Qapp from a map. oFilter neighbors by group — select the neighbor pairs which are both in the group you selected in step 1). Note: If you select Auto in step 1), the group here refers to the device inputs you will add before running the Qapp. oOrder of devices is significant — the neighbor pairs are order-sensitive. ▪Whether to include interface column: oDo not include interfaces — default option. oInclude Interfaces — adds a new interface column (such as $_intf) in the device queue table at the right side. |
Note: With this option selected, you need to run the Qapp from a map with devices and paths among them. 1)Click the drop-down menu of Device From and select Neighbor Pair. The involved devices will be displayed in the device queue table on the right side. ▪One device per Path (each hop) — includes each device only. ▪Downstream Pair — includes each device and its next-hop (such as next). ▪Upstream Pair — includes each device and its previous hop (such as prev). ▪Path Triplet — includes each device, its previous and next hop. 2)Click Advanced to configure whether to include interface information in the device queue table based on your needs. ▪Do not include interfaces — only includes the device column (such as $this). ▪Include Interfaces — the default option to add two interface columns (such as $_in_intf and $_out_intf). |
Note: To use this option, make sure you have already specified the Global Table. 1)Click the drop-down menu of Device From and select Table. 2)Select the variables you want to include in the device queue from the Variable drop-down list. 3)Select the checkbox in the device column to set a variable as a device if it stands for a device. Tip: You can rename a table header under the Header in the DQ column by double-clicking a table cell. |
3.Extend the next node for the Device Queue node based on your needs. For how to extend nodes, see Extending a node for details.
▪Device (such as this, nbr, prev, and next, which can be extended depends on the settings you selected in step 2).
Next nodes: