Configuring NTP Client on NetBrain Servers

Contents
Note: If all NetBrain servers are joined to a Windows domain, the NTP client service on these servers is automatically started by default. In this case, configuring NTP is not required.
Prerequisite: Before configuring NTP, prepare an internal NTP server or find the FQDN of a reliable external NTP server for usage. UDP port 123 must be open on the internal NTP server and on network firewalls to allow NTP traffic.
Follow the instructions to configure NetBrain servers as an NTP client:
Configuring NTP on Windows
Example: Configure Windows 2012 R2 as an NTP client with the NTP Server address 0.rhel.pool.ntp.org.
1.Open the Windows Registry Editor.
2.In the Registry Editor, configure the FQDN or IP address of the NTP server.
1)Navigate to the following registry path.
HKEY_LOCAL_MACHINE\SYSTEM\CurrentControlSet\Services\W32Time\Parameters
2)Double-click the NtpServer parameter to enter 0.rhel.pool.ntp.org in the Value data field, and then click OK.
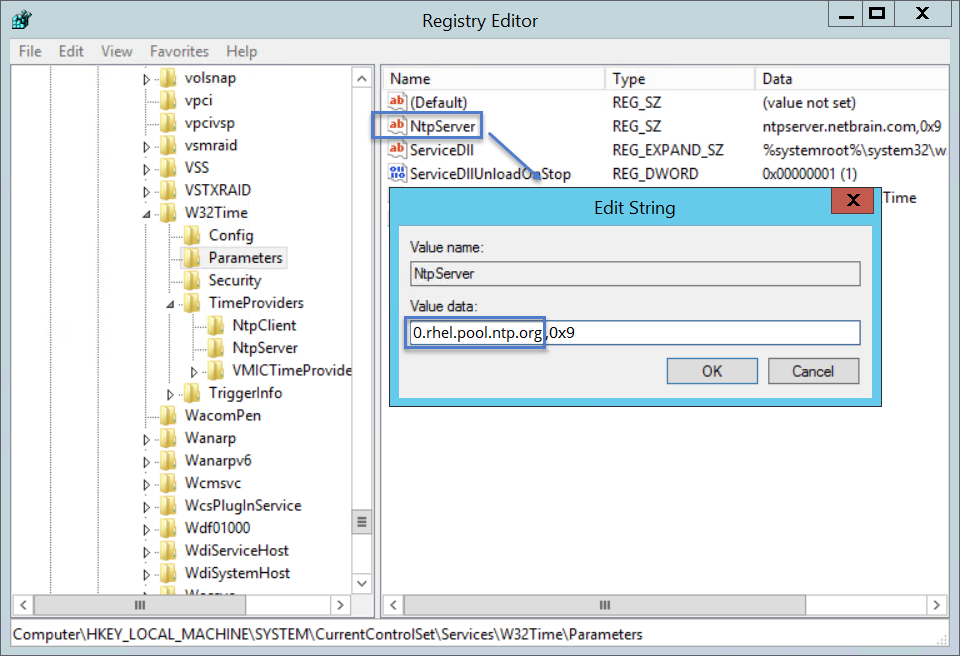
Note: Don't remove the comma and 0x9 flag behind the FQDN or IP address.
3.Enable the NTP service and set the clock synchronization frequency.
1)Navigate to the following registry path.
HKEY_LOCAL_MACHINE\SYSTEM\CurrentControlSet\Services\W32Time\TimeProviders\NtpClient
2)Double-click the Enabled parameter to enter 1 in the Value data field, and then click OK.
3)Double-click the SpecialPollInterval parameter.
4)In the pop-up dialog, select Decimal in the Base area, and enter the clock synchronization frequency (seconds) in the Value data field. It is recommended to set the frequency to 3600 or 900.
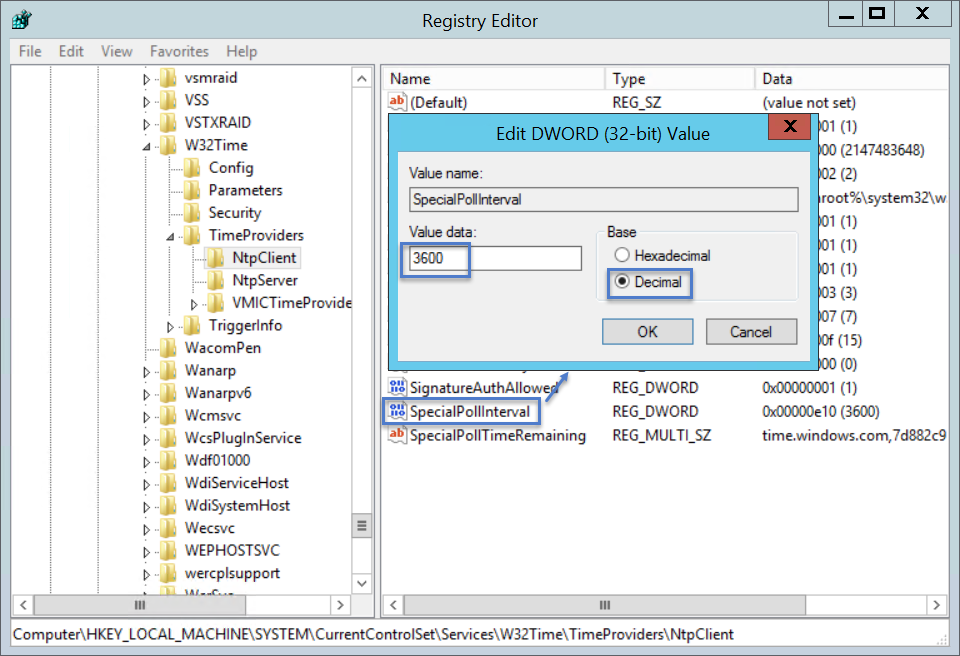
5)Click OK.
4.Increase the thresholds for phase corrections boundaries.
By default, only when the time difference between the system clock and NTP server clock is within 54000 seconds, the system clock can be automatically synchronized. It is recommended to increase it to 4294967295 seconds.
1)Navigate to the following registry path.
HKEY_LOCAL_MACHINE\SYSTEM\CurrentControlSet\Services\W32Time\Config
2)Double-click the MaxNegPhaseCorrection parameter to enter FFFFFFFF (4294967295 for decimal number) in the Value data field, and then click OK.
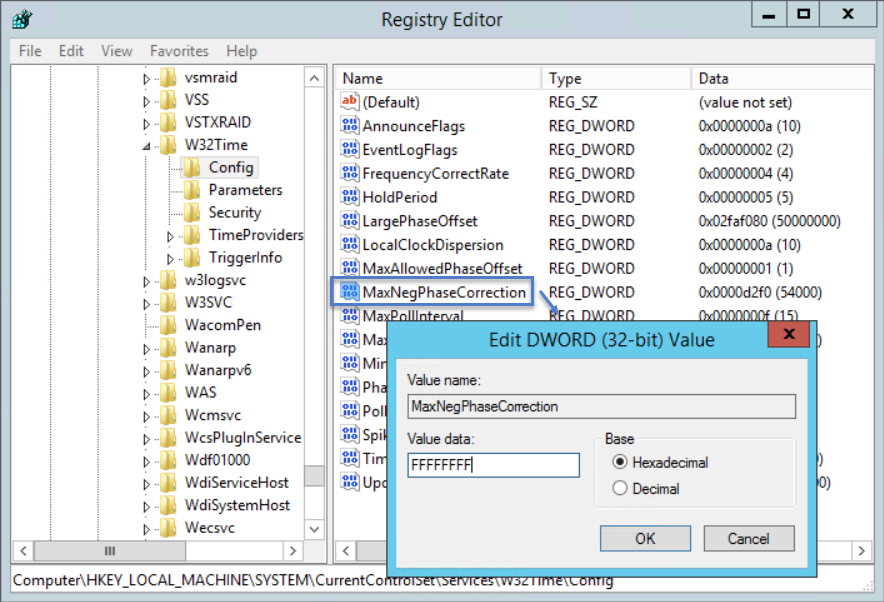
3)Double-click the MaxPosPhaseCorrection parameter to repeat the setting for the MaxNegPhaseCorrection parameter.
5.Open the command prompt to restart and configure the Win32Time service.
1)Run the net stop w32time && net start w32time command to restart the service.
2)Run the sc config w32time start=auto command to set the service to automatically start when it is stopped.
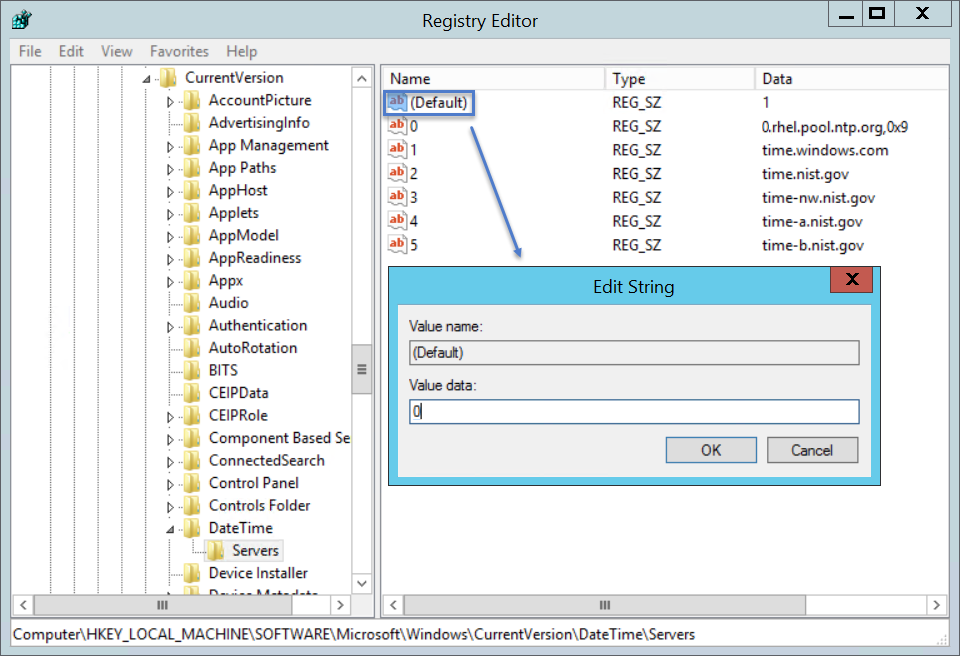
6.In the Registry Editor, set the newly added NTP server FQDN or IP address as the default one.
1)Navigate to the following registry path.
Computer\HKEY_LOCAL_MACHINE\SOFTWARE\Microsoft\Windows\CurrentVersion\DateTime\Servers
2)Right-click the Servers folder, select New > String Value from the drop-down menu, and enter 0 as the new parameter name.
3)Double-click the 0 parameter, and enter 0.rhel.pool.ntp.org.0x9 in the Value data field, and then click OK.
4)Double-click the (Default) parameter to enter 0 in the Value data field, and then click OK.
7.Run the w32tm /config /reliable:yes /update command to set the 0.rhel.pool.ntp.org as a reliable NTP server address.
Configuring NTP on Linux
Example: Configure NTP on Centos 7 with the NTP Server address 0.rhel.pool.ntp.org.
1.Log in to the Linux server as root user and open a command prompt.
2.Run the rpm -q ntp command to check whether NTP is installed on the machine. If yes, go to step 4 directly; if not, continue with step 3 to install the NTP package.
3.Install NTP and start ntpd service.
1)Run the yum -y install ntp command to download and install the NTP package.
2)Run the systemctl enable ntpd command to enable the ntpd service.
3)Run the systemctl start ntpd command to start the ntpd service.
4.Add the FQDN or IP address of NTP server to the ntp.conf file.
1)Run the cd /etc command to navigate to the /etc directory.
2)In the ntp.conf file, replace 0.centos.pool.ntp.org iburst with 0.rhel.pool.ntp.org prefer in the server row. For how to modify the file, refer to Editing a File with VI Editor.
# Use public servers from the pool.ntp.org project.
# Please consider joining the pool (http: //www.pool.ntp.org/join.html).
server 0.rhel.pool.ntp.org prefer
server 1.centos.pool.ntp.org iburst
server 1.centos.pool.ntp.org iburst
server 1.centos.pool.ntp.org iburst
5.Run the systemctl restart ntpd command to restart the ntpd service.
6.Check the connection with NTP server by running the ntpstat command.
[root@localhost etc]# ntpstat
synchronised to NTP server (85.199.214.100) at stratum 2
time correct to within 380 ms
polling server every 64s
7.Configure NTP clock synchronization for hardware clock.
1)Run the cd /etc/sysconfig command to navigate to the /etc/sysconfig directory.
2)Add SYNC_HWCLOCK=yes to the ntpd file.
[root@localhost sysconfig]# cat ntpd
# Command line options for ntpd
OPTIONS="-g"
SYNC_HWCLOCK=yes