Configuring TACACS+ Authentication

Contents
The system allows power users to configure TACACS+ server profile to support both authentication and roles/privileges assignment for external user accounts on the TACACS+ server.
Select either way to create a TACACS+ server profile for external authentication:
▪Creating a Standard TACACS+ Server Profile
▪Creating an ISE TACACS+ Server Profile
Creating a Standard TACACS+ Server Profile
Note: By using a standard TACACS+ server profile for authentication, the system assigns the same roles and privileges to all the user accounts on the TACACS+ server.
1.Log in to the System Management page.
2.In the System Management page, click User Accounts > External Authentication.
3.Click the ![]() icon and select Add TACACS+ Authentication from the drop-down list.
icon and select Add TACACS+ Authentication from the drop-down list.

4.Define the details of the TACACS+ server profile.

1)Enter a unique name and a brief description of the TACACS+ server.
2)Keep Standard checked.
3)Enter the required credentials and parameters to connect to the TACACS+ server. See TACACS+ Server Parameters for more details.
4)Assign NetworkBrain roles and privileges to all the user accounts on the TACACS+ server.
5)Click Save.
5.Verify the connection by entering the username and password of a user account on the TACACS+ server.
Creating an ISE TACACS+ Server Profile
Note: By using an ISE TACACS+ server profile for authentication, the system can assign NetworkBrain roles and privileges to each attribute-value pair configured on the ISE TACACS+ server. Thus, external user accounts can keep finer-grained roles and privileges in good shape before the first-time login in the NetworkBrain system.
Prerequisites: The mandatory attributes and values have been configured in the TACACS profile of your ISE system.

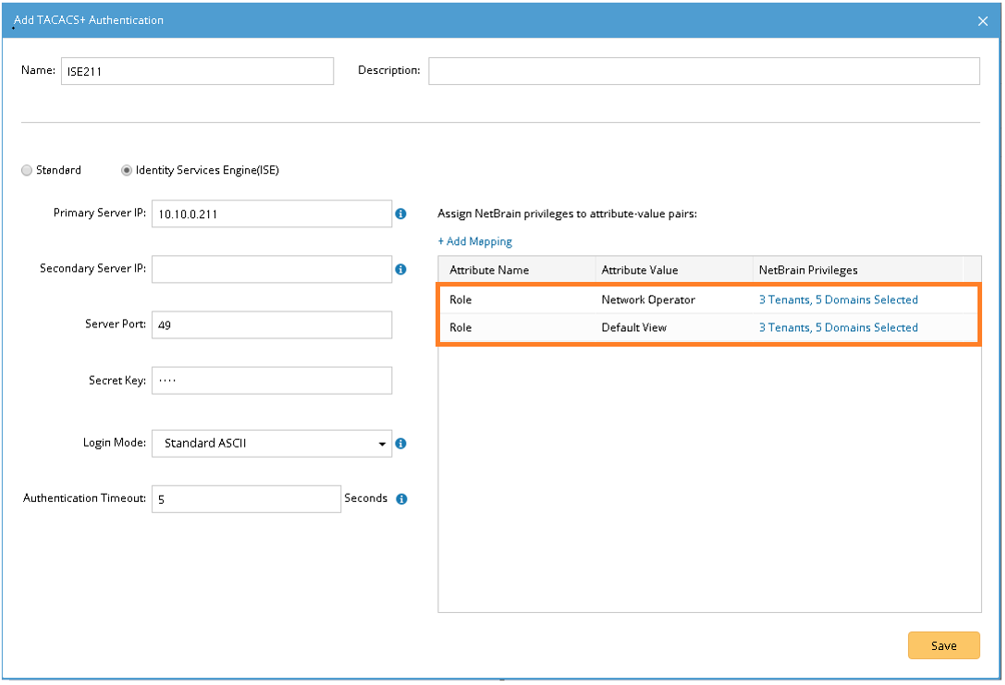
For example, you have two roles (Network Operator and Default View) defined as above, and you want to map them respectively to NetworkBrain roles “Power User” and “Engineer”.
Do the following in your NetworkBrain system:
1.Log in to the System Management page.
2.In the System Management page, click User Accounts > External Authentication.
3.Click the ![]() icon and select Add TACACS+ Authentication from the drop-down list.
icon and select Add TACACS+ Authentication from the drop-down list.
6.Define the details of the ISE TACACS+ server profile.
1)Enter a unique name and a brief description of the TACACS+ server.
2)Select Identity Services Engine (ISE).
3)Enter the required credentials and parameters to connect to the TACACS+ server. See TACACS+ Server Parameters for more details.
4)Click Add Mapping to add a new attribute/value pair and assign the corresponding NetworkBrain role to it.

a)In the Attribute Name field, enter Role.
b)In the Attribute Value field, enter Network Operator.
c)Select the target tenant and domain, and click Assign Privileges > Power User.
d)Click OK.
5)Repeat step 4) to add a new attribute/value pair Role/Default View and assign the Engineer role to it.
6)Review and configurations and click Save.
7.Verify the connection by entering the username and password of a user account on the TACACS+ server.
TACACS+ Server Parameters
The following table lists the credentials that are required when connecting to a TACACS+ server.
Field |
Description |
|---|---|
Primary Server IP |
The IP address of the primary TACACS+ server. |
Secondary Server IP |
The IP address of a backup TACACS+ server. It is used when the primary TACACS+ server is unavailable. If you do not have the backup server, leave this field empty. |
Server Port |
The port number used to listen for TACACS+ authentication requests and send responses. Make sure it is consistent with the port number you have configured on the TACACS+ server. |
Secret Key |
The password used to access the TACACS+ server. Make sure it is consistent with the key that you have configured on the TACACS+ server. |
Login Mode |
The authentication method used to encrypt the connections to the TACACS+ server. Four types of login modes are supported: Standard ASCII, PAP, CHAP, and MS-CHAP. Make sure it is consistent with the authentication method you have configured on the TACACS+ server. |
Authentication Timeout |
The time interval between sending authentication password and getting an authentication response from the TACACS+ server. When the authentication time exceeds the threshold, it will be treated as an authentication timeout and an error message will be displayed. |