Installing Web Server and Web API Server

Contents
Multiple Web/Web API Servers can be installed and load balanced under your load-balancing infrastructure. You can repeat the installation steps to install Web Servers paired with Web API Servers per data center location to reduce the response time for accessing web pages of Thin Clients.
Note: If you want to install multiple Web API Servers, you need to install them in sequence, that is, install one after the installation of another one is finished.
Note: It is highly recommended that the extended memory of your machine is larger than 16GB.
Note: Existing Internet Information Services (IIS) must be removed, and FIPS setting must be disabled by modifying the Enabled value to 0 under the HKEY_LOCAL_MACHINE\SYSTEM\CurrentControlSet\Control\Lsa\FipsAlgorithmPolicy directory of Windows registry.

Complete the following steps to install Web API Server and Web Server on the same machine with administrative privileges.
1.Obtain the netbrain-ie-windows-x86_64-7.1a2.zip file from NetBrain and save it in your local folder.
2.Extract installation files from the netbrain-ie-windows-x86_64-7.1a2.zip file.
3.Right-click the netbrain-ie-windows-x86_64-7.1a2.exe file, and then select Run as administrator to start the Installation Wizard.
1)On the Welcome page, click Next.
2)On the NetBrain Integrated Edition Prerequisites page, read the components that must be set up in your environment beforehand and click Next.

3)On the System Configuration page, review the system configuration summary and click Next.
4)On the License Agreement page, read the license agreements and click I AGREE.
5)On the Customer Information page, enter your username and company name, and then click Next.
6)On the Destination Location page, click Next to install the Web Server and Web API Server under the default directory C:\Program Files\NetBrain\. If you want to install it under another location, click Change.
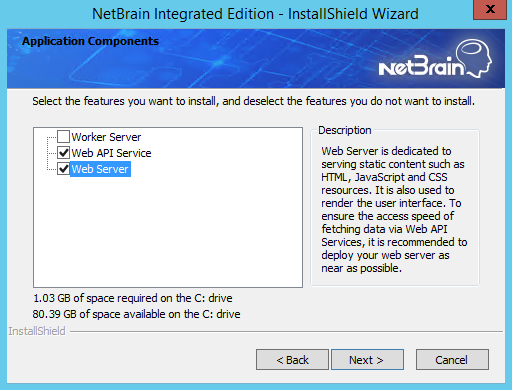
7)Select both the Web API Service and Web Server check boxes, and then click Next.
8)Enter the following information to connect to MongoDB Server and initialize the data in it and then click Next.

▪IP Address — enter the IP address of MongoDB Server and the corresponding port number. By default, the port number is 27017.
Tip: If you set up a MongoDB replica set, enter the IP address and port number of the primary server, secondary server, and arbiter server in order in three lines by pressing the Ctrl + Enter keys. See Installing a MongoDB Replica Set for more details.
Tip: You can enter the fully qualified domain name (FQDN) of the MongoDB Server if all NetBrain servers are managed in the same domain. For example, test.netbraintech.com:27017.Note: Enter the FQDN of MongoDB Server and the port number if you configure one while installing NetBrain Database Server.
▪User Name — enter the username that you created when installing MongoDB Server.
▪Password — enter the password that you created when installing MongoDB Server.
▪Replica Set Name — enter the replica set name of the MongoDB Server. By default, it is rs.
Note: If you installed MongoDB Server by using MongoDB official installation package, you must also set up a replica set name. See the documentation https://docs.mongodb.com/manual/tutorial/deploy-replica-set/ on MongoDB official website for reference.
Tip: You can confirm the replica set name through the /etc/netbrain/install_mongodb.conf file on the machine where the MongoDB Server is installed.
▪Use SSL — used to encrypt the connections to MongoDB Server with SSL. If SSL is enabled on MongoDB Server, select the check box; otherwise, leave it unchecked.
9)Enter the following information to connect to License Agent Server, and then click Next.

▪Use License Agent — used to control whether to use License Agent Server for license validation. Keep it checked.
▪License Agent port — the port number that the service of License Agent Server listens to. By default, it is 27654.
▪Use SSL — used to encrypt the connections to License Agent Server with SSL. If SSL is enabled on License Agent Server, select it; otherwise, leave it unchecked.
10) Enter the following information to connect to Index Server, and then click Next.
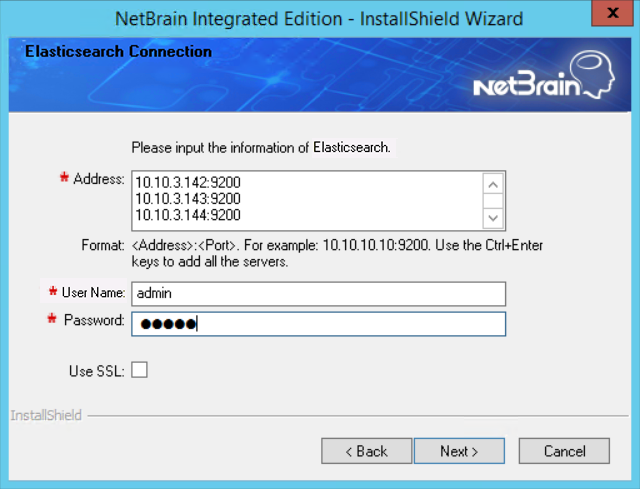
▪Address — enter the IP address of Index Server and the corresponding port number. For example, 10.10.3.142:9200.
Tip: If you set up an Index Server Cluster, enter the IP address and port number of the two master servers and one master-only server in order in three lines by pressing the Ctrl + Enter keys. See Installing an Index Server Cluster for more details.
Tip: You can enter the FQDN of Index Server if all NetBrain servers are managed in the same domain. For example, test.netbraintech.com:9200.
Note: If a proxy server is configured on this machine to access the Internet, you must add the IP address and port number of NetBrain Index Server into the proxy exception list of the web browser, to ensure this NetBrain server can communicate with the Index Server.
▪User Name — enter the username that you created when installing Index Server.
▪Password — enter the password that you created when installing Index Server.
▪Use SSL — used to encrypt the connections to Index Server with SSL. If SSL is enabled on the Index Server, select it; otherwise, leave it unchecked.
11) Enter the following information to connect to Message Server, and then click Next.
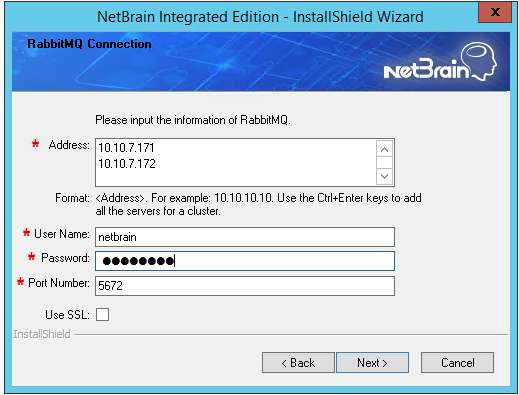
▪Address — enter the IP address of Message Server.
Tip: If you set up a Message Server Cluster, enter the IP address of each member in order in two lines by pressing the Ctrl + Enter keys. See Configuring a Message Server Cluster for more details.
▪User Name — enter the admin username that you created when installing Message Server.
▪Password — enter the admin password corresponding to the username that you created when installing Message Server.
▪Port Number — enter the port number used by Message Server to communicate with Web API Server and Worker Server. By default, it is 5672.
▪Use SSL — used to encrypt the connections to Message Server with SSL. If SSL is enabled on Message Server, select it; otherwise, leave it unchecked.
12) Enter the following information to connect to Cache Server, and then click Next.
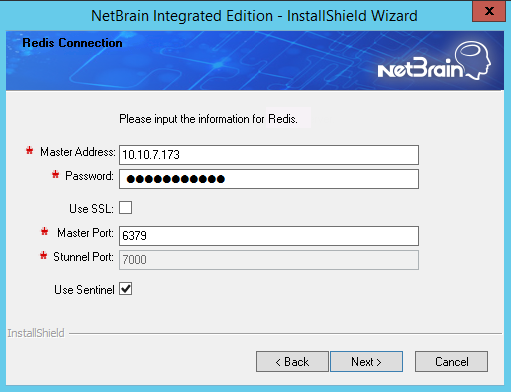
▪Master Address — enter the IP address of Master Cache Server.
Note: Don't use FQDN or hostnames to connect to Master Cache Server.
▪Password — enter the admin password that you created when installing Master Cache Server.
▪Use SSL — used to encrypt the connections to Master Cache Server with SSL. If SSL is enabled on Master Cache Server, select it; otherwise, leave it unchecked.
▪Redis Port — enter the port number used by Master Cache Server to communicate with Web API Server, Worker Server, and Front Server Controller. By default, it is 6379.
▪Stunnel Port — required only if Use SSL is enabled. Enter the port number of the secure stunnel used to forward all traffics on Master Cache Server. By default, it is 7000.
▪Use Sentinel — select the check box only if you set up a Cache Server Cluster. See Configuring a Cache Server Cluster for more details.
13) This step is required only if the Use Sentinel check box is selected in the previous step. Enter the required information for the Cache Server Cluster, and then click Next.

▪Slave Address — the IP address of Slave Cache Server.
▪Slave Port — the port number used by Slave Cache Server to communicate with Web API Server and Worker Server.
▪Stunnel Port — required only if Use SSL is enabled. Enter the port number of the secure stunnel used to forward all traffics on the Slave Cache Server or Sentinel Cache Server.
▪Sentinel Address — the IP address of Sentinel Cache Server.
▪Sentinel Port — the port number used by the Sentinel to listen to the Master Cache Server.
14) This step is required only if SSL is enabled on MongoDB, License Agent Server, Index Server, Message Server, or Cache Server. Configure whether to authenticate the Certificate Authority (CA) of the SSL certificates on these servers, and then click Next.

To authenticate CA:
a)Select the Conduct Certificate Authority verification check box.
b)If the CA has not been installed on this machine, click Browse to import the CA certificate file, for example, ca.pem; otherwise, select I have already installed the Certificate Authority on this machine.
Note: Only the certificate in Base-64 encoded X.509 PEM format is supported.
15) Review the summary of the installation settings and click Install.
4.Click Finish to complete the installation process and exit the Installation Wizard. After successfully installing the Web Server and Web API Server, you can open the IIS Manager to check whether the Default Web Site and ServicesAPI service exist.
Tip: The installation log file is saved under the C:\ drive. If you encounter any issues during the installation, check the log file for more details.
Tip: To have the required configurations auto-populated during the installation of other system components, you can copy the NBIEInstall folder from the C:\ drive of this machine directly to the C:\ drive of the machines where Worker Server, Task Engine, and Front Server Controller will be installed.