Installing Task Engine on Windows

Contents
Depending on your network scale, you can deploy either a standalone Task Engine, or two for high availability.
Complete the following steps with administrative privileges.
1.Obtain the netbrain-taskengine-windows-x86_64-7.1a2.zip file from NetBrain and save it in your local folder.
2.Extract installation files from the netbrain-taskengine-windows-x86_64-7.1a2.zip file.
3.Right-click the netbrain-taskengine-windows-x86_64-7.1a2.exe file, and then select Run as administrator to start the Installation Wizard.
1)On the Welcome page, click Next.
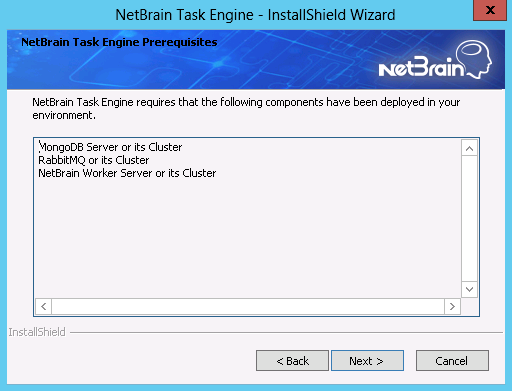
2)View the components that must be set up in your environment beforehand and click Next.
3)On the System Configuration page, review the system configuration summary and click Next.
4)On the License Agreement page, read the license agreements and click I AGREE.
5)On the Customer Information page, enter your username and company name, and then click Next.
6)On the Destination Location page, click Next to install the Task Engine under the default directory C:\Program Files\NetBrain\. If you want to install it under another location, click Change.
7)On the Worker Server Connection page, enter the hostname of the machine where Worker Server is installed. If you set up a Task Engine Cluster, select the Enable High Availability check box.

Tip: If you have set up a Worker Server Cluster, enter the hostnames of all nodes in two or more lines by pressing the Ctrl + Enter keys.
Note: Don't use IP address or FQDN in this field.
8)Enter the following information to connect to MongoDB Server, and then click Next.
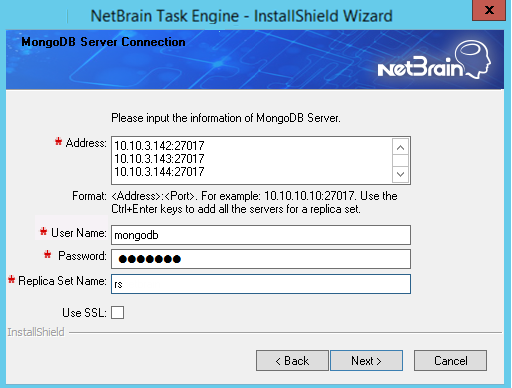
▪IP Address — enter the IP address of MongoDB Server and the corresponding port number. By default, the port number is 27017.
Tip: If you set up a MongoDB replica set, enter the IP address and port number of the primary server, secondary server, and arbiter server in order in three lines by pressing the Ctrl + Enter keys. See Installing a MongoDB Replica Set for more details.
Tip: You can enter the fully qualified domain name (FQDN) of the MongoDB Server if all NetBrain servers are managed in the same domain. For example, test.netbraintech.com:27017.Note: Enter the FQDN of MongoDB Server and the port number if you configure one while installing NetBrain Database Server.
▪User Name — enter the username that you created when installing MongoDB Server.
▪Password — enter the password that you created when installing MongoDB Server.
▪Replica Set Name — enter the replica set name of the MongoDB Server. By default, it is rs.
Note: If you installed MongoDB Server by using MongoDB official installation package, you must also set up a replica set name. See the documentation https://docs.mongodb.com/manual/tutorial/deploy-replica-set/ on MongoDB official website for reference.
Tip: You can confirm the replica set name through the /etc/netbrain/install_mongodb.conf file on the machine where the MongoDB Server is installed.
▪Use SSL — used to encrypt the connections to MongoDB Server with SSL. If SSL is enabled on MongoDB Server, select the check box; otherwise, leave it unchecked.
9)Enter the following information to connect to Message Server, and then click Next.
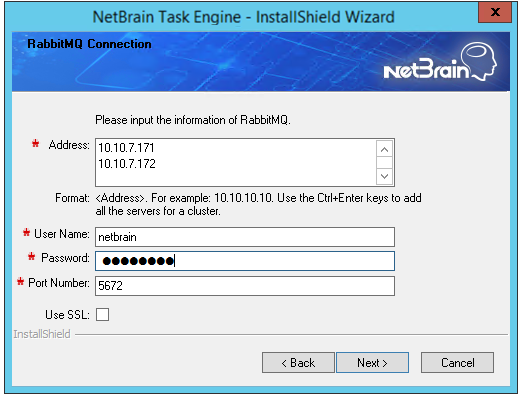
▪Address — enter the IP address of Message Server.
Tip: If you set up a Message Server Cluster, enter the IP address of each member in order in two lines by pressing the Ctrl + Enter keys. See Configuring a Message Server Cluster for more details.
▪User Name — enter the admin username that you created when installing Message Server.
▪Password — enter the admin password corresponding to the username that you created when installing Message Server.
▪Port Number — enter the port number used by Message Server to communicate with Web API Server and Worker Server. By default, it is 5672.
▪Use SSL — used to encrypt the connections to Message Server with SSL. If SSL is enabled on Message Server, select it; otherwise, leave it unchecked.
10) This step is required only if SSL is enabled on MongoDB or Message Server. Configure whether to authenticate the CA of SSL certificates on these servers, and then click Next.

To authenticate CA:
a)Select the Conduct Certificate Authority verification check box.
b)If the CA has not been installed on this machine, click Browse to import the CA certificate file, for example, ca.pem; otherwise, select I have already installed the Certificate Authority on this machine.
Note: Only the certificate in Base-64 encoded X.509 PEM format is supported.
11) Review the summary of the installation information and then click Install.
4.Click Finish to complete the installation process and exit the Installation Wizard. After successfully installing the Task Engine, you can open the Task Manager and navigate to the Services panel to check that the NetBrainTaskEngine service is running.
Tip: The installation log file is saved under the C:\ drive. If you encounter any issues during the installation, check the log file for more details.
5.For high availability, you can install one more Task Engine on another machine by repeating the above installation steps.
Note: Make sure that each Task Engine has the same configurations for Worker Server, MongoDB, and Message Server. And your network configurations allow communications among them.
Verifying Configurations of Task Engine Cluster
After configuring the cluster, you can log in to the RabbitMQ Management page to browse server nodes.
1.In your web browser, navigate to http(s)://<IP address of NetBrain Message Server>:port_number. For example, http://10.10.7.171:15672 (the default port number for the RabbitMQ Management Plugin).
2.Enter the username and password that you created when installing the Message Server, and then click Login.
3.Select Queues > nb_flowengine_leader.
4.Click Consumers. The Task Engine cluster nodes are listed.
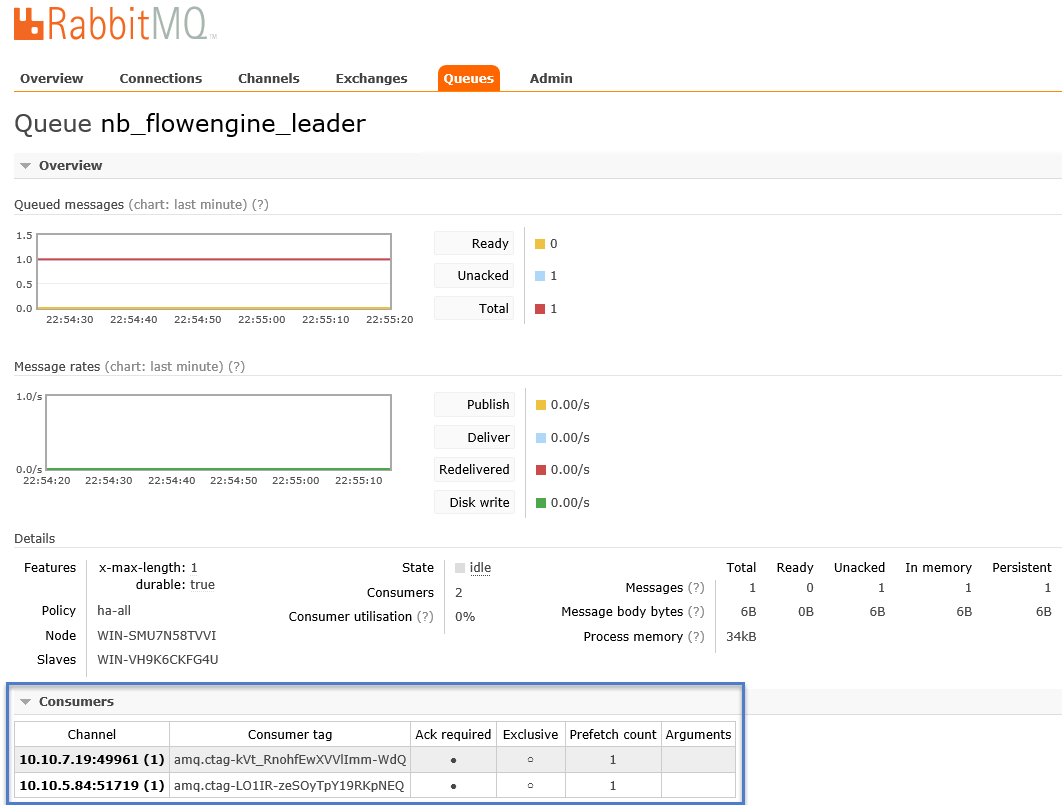
The first one is the active node responsible for active operation management. The other one is the standby node.