Installing NetBrain Application Server on Windows

Contents
NetBrain Application Server refers to a server installed with a set of system components. Before the installation, make sure that the machine meets the System Requirements and Deployment Prerequisites.
To ensure the Application Server can communicate with Index Server, you must add the IP address of the Index Server into the proxy exception list as long as you use a proxy server to access the Internet on the Application Server.
1)Click the ![]() icon at the upper-right corner of Chrome and select Settings > Advanced.
icon at the upper-right corner of Chrome and select Settings > Advanced.
2)In the System area, click Open proxy settings.
3)On the Connections tab, click LAN settings.
4)In the Proxy Server area, click Advanced to add the IP address and port number of Index Server into the Exceptions area.
Note: It is highly recommended that the extended memory of your machine is larger than 16GB.
Note: Existing Internet Information Services (IIS) must be removed, and FIPS setting must be disabled by modifying the Enabled value to 0 under the HKEY_LOCAL_MACHINE\SYSTEM\CurrentControlSet\Control\Lsa\FipsAlgorithmPolicy directory of Windows registry.

Installing Application Server
To install NetBrain Application Server, complete the following steps with administrative privileges.
1.Obtain the netbrain-all-in-two-windows-x86_64-7.1a.zip file from NetBrain and save it in your local folder.
2.Extract files from the netbrain-all-in-two-windows-x86_64-7.1a.zip file.
3.Extract the installation files of Application Server from the netbrain-application.zip file.
4.Navigate to the netbrain-application folder, and then right-click the netbrain-application.exe file and then select Run as administrator to launch the Installation Wizard.
5.Follow the Installation Wizard to complete the installation step by step:
1)On the Welcome page, click Next.
2)On the System Configuration page, review the system configuration summary and click Next.
3)On the License Agreement page, read the license agreement and click I AGREE.
4)Click Next to install the Application Server under the default path: C:\Program Files\NetBrain\. If you want to install it under another location, click Change.
Note: If you select to install it under another drive, make sure there are no spaces in the installation path. For example, use D:\Program_Files\ instead of D:\Program Files\.
5)On the MongoDB Server Connection page, enter the following information to connect to the MongoDB Server, and then click Next.
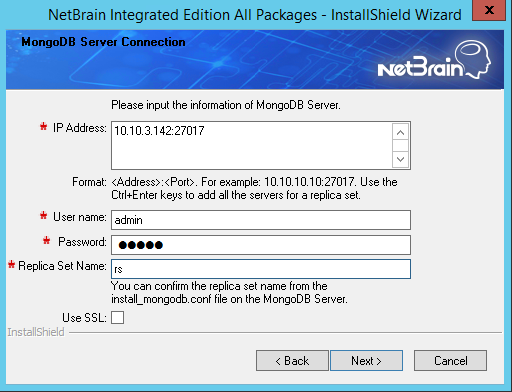
▪IP Address — enter the IP address of MongoDB Server and the corresponding port number. By default, the port number is 27017.
Tip: If you set up a MongoDB replica set, enter the IP address and port number of the primary server, secondary server, and arbiter server in order in three lines by pressing the Ctrl + Enter keys. See Installing a MongoDB Replica Set for more details.
Tip: You can enter the fully qualified domain name (FQDN) of the MongoDB Server if all NetBrain servers are managed in the same domain. For example, test.netbraintech.com:27017.Note: Enter the FQDN of MongoDB Server and the port number if you configure one while installing NetBrain Database Server.
▪User Name — enter the username that you created when installing MongoDB Server.
▪Password — enter the password that you created when installing MongoDB Server.
▪Replica Set Name — enter the replica set name of the MongoDB Server. By default, it is rs.
Note: If you installed MongoDB Server by using MongoDB official installation package, you must also set up a replica set name. See the documentation https://docs.mongodb.com/manual/tutorial/deploy-replica-set/ on MongoDB official website for reference.
Tip: You can confirm the replica set name through the /etc/netbrain/install_mongodb.conf file on the machine where the MongoDB Server is installed.
▪Use SSL — used to encrypt the connections to MongoDB Server with SSL. If SSL is enabled on MongoDB Server, select the check box; otherwise, leave it unchecked.
6)On the License Agent Server Information page, enter the following information to connect to the License Agent Server, and then click Next.

▪Use License Agent — used to control whether to use License Agent Server for license validation. Keep it checked.
▪License Agent port — the port number that the service of License Agent Server listens to. By default, it is 27654.
▪Use SSL — used to encrypt the connections to License Agent Server with SSL. If SSL is enabled on License Agent Server, select it; otherwise, leave it unchecked.
7)On the Elasticsearch Connection page, enter the following information to connect to the Index Server, and then click Next.
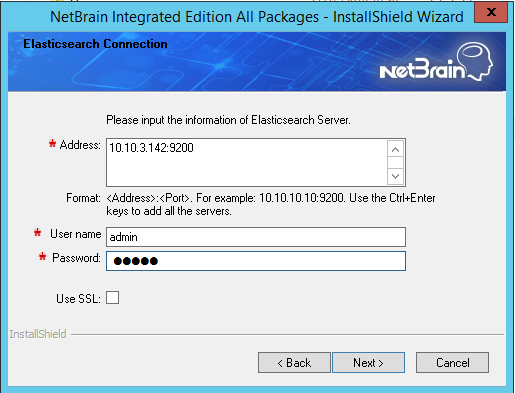
▪Address — enter the IP address of Index Server and the corresponding port number. For example, 10.10.3.142:9200.
Tip: If you set up an Index Server Cluster, enter the IP address and port number of the two master servers and one master-only server in order in three lines by pressing the Ctrl + Enter keys. See Installing an Index Server Cluster for more details.
Tip: You can enter the FQDN of Index Server if all NetBrain servers are managed in the same domain. For example, test.netbraintech.com:9200.
Note: If a proxy server is configured on this machine to access the Internet, you must add the IP address and port number of NetBrain Index Server into the proxy exception list of the web browser, to ensure this NetBrain server can communicate with the Index Server.
▪User Name — enter the username that you created when installing Index Server.
▪Password — enter the password that you created when installing Index Server.
▪Use SSL — used to encrypt the connections to Index Server with SSL. If SSL is enabled on the Index Server, select it; otherwise, leave it unchecked.
8)On the NetBrain Front Server Controller page, configure the following parameters to connect to the Front Server Controller. Click Next.
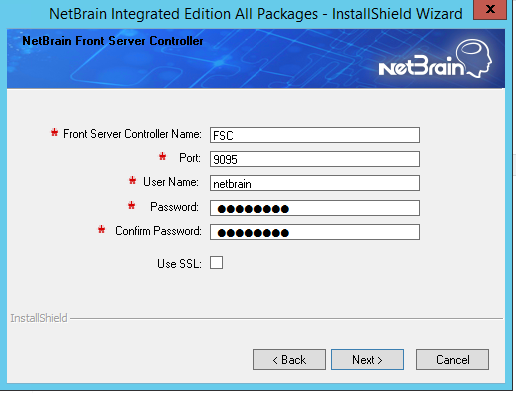
Note: Keep notes of the password because it is required when you allocate tenants to Front Server Controller.
Note: Select the Use SSL check box only if you want to encrypt the connections to the Front Server Controller.
9)This step is required only if Use SSL is enabled for the Front Server Controller. On the Certificate Configuration page, configure the SSL certificate and private key.
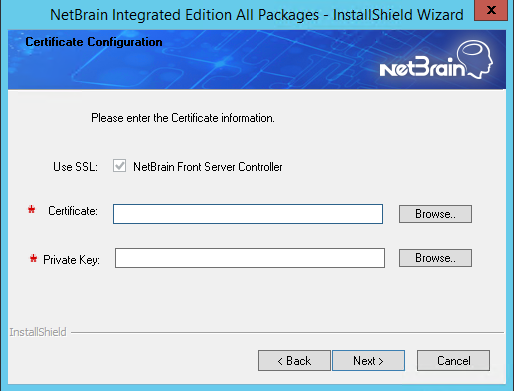
▪Certificate — required only if SSL is enabled. Click Browse to select the certificate containing the public key. For example, cert.pem.
▪Private Key — required only if SSL is enabled. Click Browse to select the private key file. For example, key.pem.
10) This step is required only if SSL is enabled on MongoDB Server, License Agent, or Elasticsearch. Configure whether to authenticate the Certificate Authority (CA) that issues the SSL certificates, and then click Next.

To authenticate CA:
a)Select the Conduct Certificate Authority verification check box.
b)If the CA has not been installed on this machine, click Browse to import the CA certificate file, for example, ca.pem; otherwise, select I have already installed the Certificate Authority on this machine.
Note: Only the certificate in Base-64 encoded X.509 PEM format is supported.
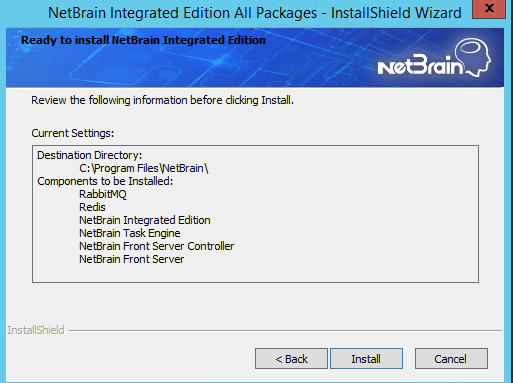
11) Review the server components to be installed and click Install.
6.After NetBrain Application Server is successfully installed, click Finish to complete the installation process and exit the Installation Wizard.