Resolving Duplicated IP and Subnet

Contents
The duplicate IPs refer to the interfaces configured with the same IPv4 addresses.
During the live network discovery, the system parses the VRF and IPv4 address for each interface and deals with the interfaces of duplicated IPs as follows:
▪If two interfaces are configured with the same IP address, but with different VRFs, then two zones named after the VRFs will be created automatically after the IPv4 L3 topology is built, and these two interfaces will be moved to the corresponding zone according to its configured VRF.
▪If two interfaces are configured with the same IP address, but without VRFs configured, these two interfaces will be moved to the Default Zone. To separate the two interfaces, you must create a zone manually, then move one of the interfaces and its neighbor interfaces into the created zone, and finally rebuild the IPv4 L3 topology.
Tip: The Default Zone is auto-generated in each domain by the system to store interfaces in IPv4 L3 topology by default. It can neither be renamed nor deleted.
After the interfaces of duplicated IPs being moved into different zones, all duplicated IPs can be involved in IPv4 L3 topology link calculations. When you extend IPv4 L3 neighbors, all calculated links can be displayed on the same map page.
Tip: All the topology links generated in IPv4 L3, IPv6 L3, and L2 topology can be browsed in the Topology Link Manager.
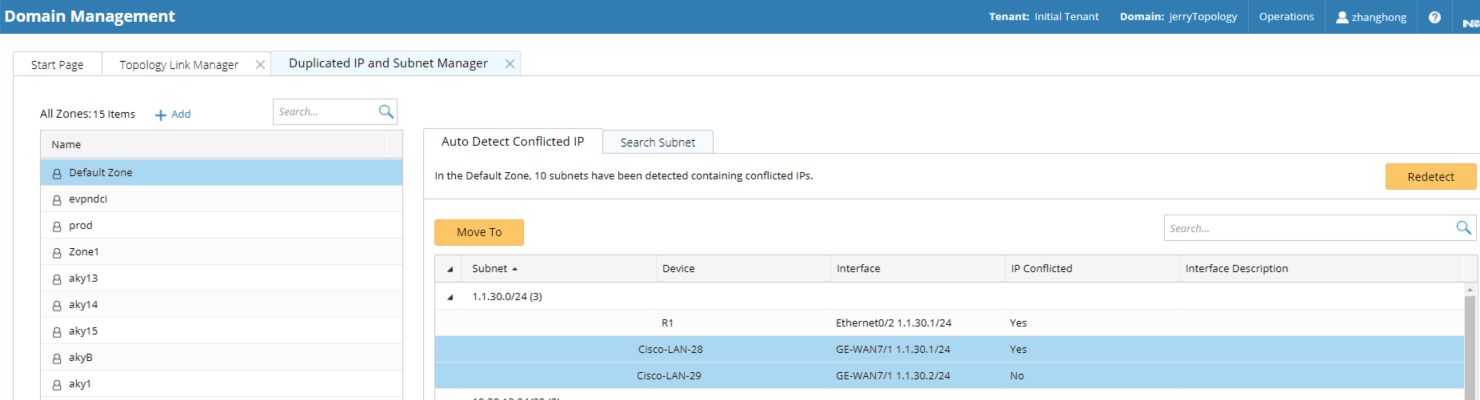
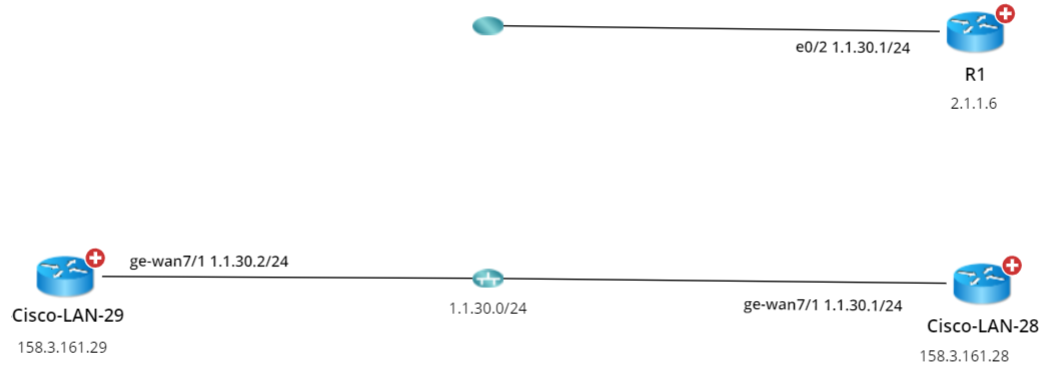
Example: Devices "R1” and "Cisco-LAN-28” are configured with the same IP address, but without VRF configured. The device "Cisco-LAN-29” in real network should be connected to the device "Cisco-LAN-28”, but now it is wrongly connected to the device "R1” because of the duplicated IP issue.

To correct the topology link, complete the following steps to resolve the duplicated IP issue:
1.Log into Domain Management page.
2.In the Domain Management page, click Operations > Topology Manager > Duplicated IP and Subnet Manager from the quick access toolbar. All subnets that contain duplicate IPs in the Default Zone are listed under the Auto Detect IP Conflicted IP tab.
Tip: To refresh the data, click Redetect.
3.Create a zone.
1)Click Add at the upper-right corner of the left pane.
2)Enter the zone name, for example, Zone1 and click OK.
4.Move the interface of duplicated IP and its neighbor interfaces that you want to establish topology link to the newly created zone based on your judgment and rebuild the IPv4 L3 topology.
1)Select the interface of duplicated IP and its neighbor interfaces that you want to establish topology link, and then click Move To. In this example, select the GE-WAN7/1 interface of the Cisco-LAN-29 device and the GE-WAN7/1 interface of the Cisco-LAN-28 device and move them into zone1.
Tip: If a lot of duplicated subnets are detected in the Default Zone, you can quickly search them by entering their IP addresses and subnet masks on the Search Subnet tab. Use semicolons to separate the multiple items.
2)Select the zone that you created and click Move To.
Note: The Move To operation will delete all the manually added topology links of this interface.
3)Click Yes when a confirmation dialog box pops up.
4)Click OK when a successful notification dialog box pops up.
5)Click Yes to rebuild the IPv4 Layer 3 topology in the pop-up dialog box.
After resolving duplicated IPs, the topology links are correctly connected.
See also: