Using OVA File to Install NetBrain Database Server

Contents
The following sections describe how to deploy and configure the virtual appliance of NetBrain Database Server on VMware ESXi by either of the following ways:
Using vSphere Web Interface
1.Download the netbrain-database-appliance-10.1.ova file and save it in your local folder.
Tip: Contact NetBrain Support Team to get the download link.
2.Complete the following steps to deploy NetBrain Database Server onto VMware ESXi 6.0/6.5/7.0 through the vSphere Web Interface. Here we take the interface of ESXi 6.5 as an example.
Note: Using Chrome or Firefox is highly recommended.
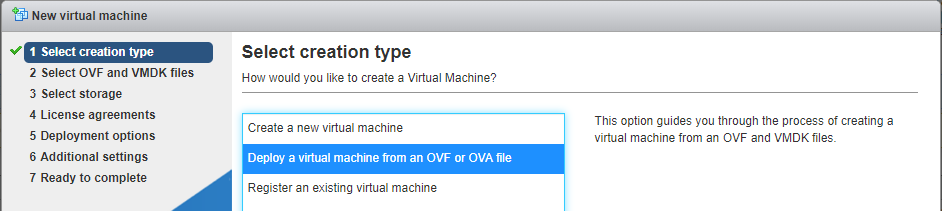
1)Right-click Host in the Navigator pane and then select Create/Register VM.
2)Select Deploy a virtual machine from an OVF or OVA file as the way to create a virtual machine, and then click Next.
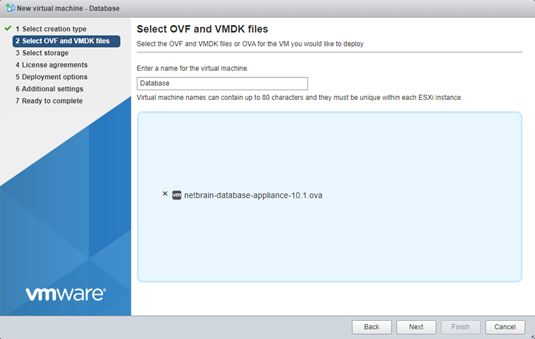
3)Enter a name for the virtual machine, drag the database server installation file to the blank area, and then click Next.
4)Select a datastore to save the configuration files and all virtual disks of the virtual machine, and then click Next.
5)Configure the deployment options, and then click Next.
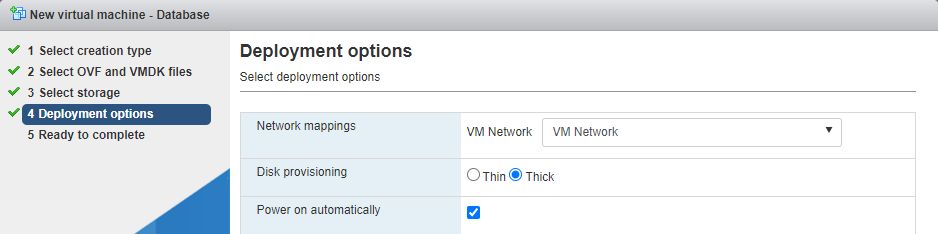
▪Network mapping — specify the network connectivity between the virtual machine and the physical machine.
▪Disk provisioning — specify the provisioning format for a virtual machine.
oThin — only a certain amount of storage space on a datastore is provisioned to virtual disk files when the virtual machine is created.
oThick (recommended)— all the space designated for the virtual disk files on a datastore is reserved when the VM is created.
▪Power on automatically — select the check box to make the virtual machine powered on automatically after the deployment.
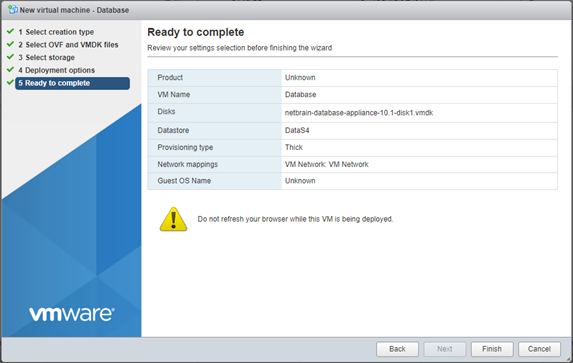
6)Review the deployment settings and click Finish.
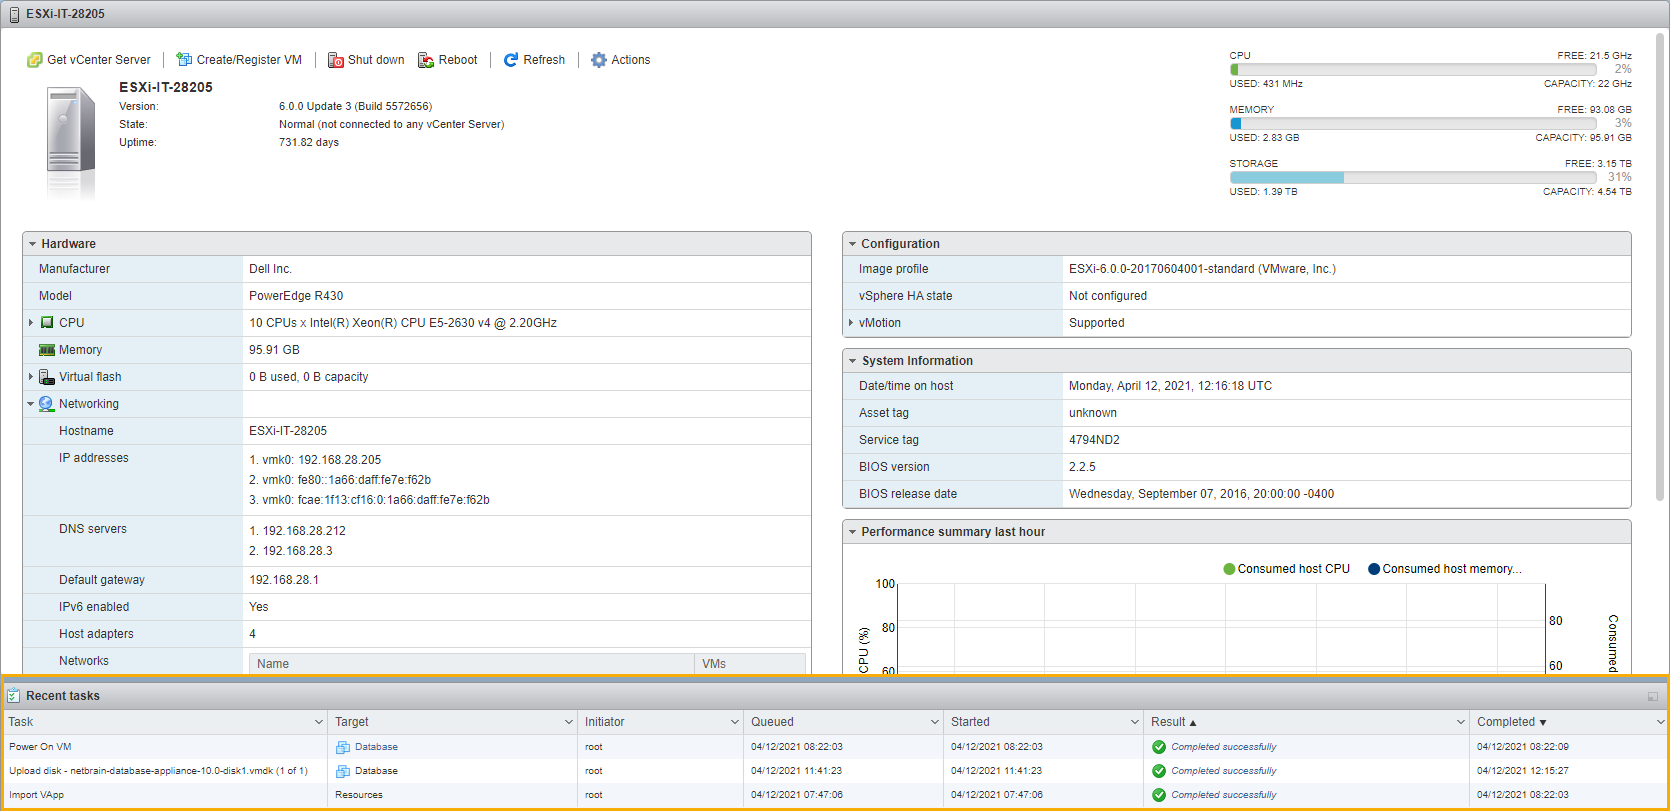
7)A new task for creating the virtual machine appears in the Recent tasks pane.
3.On the Virtual Machines tab, select the virtual machine you created, and then click Console > Open browser console to open a console window.
4.Configure the Virtual Appliance.
Using vSphere Client
1.Download the netbrain-database-appliance-10.1.ova file and save it in your local folder.
Tip: Contact NetBrain Support Team to get the download link.
2.Complete the following steps to deploy NetBrain Database Server onto VMware ESXi by using vSphere Client.
1)Click File > Deploy OVF Template from the ribbon toolbar.
2)Click Browse to specify the location of the netbrain-database-appliance-10.1.ova file, and then click Next.
3)Review the details of the OVF template, and click Next.
4)Review the name of the virtual machine, and then click Next.
5)Specify the format to store the virtual disk, and then click Next.
▪Thick Provision Lazy Zeroed (recommended) — all the storage space on a datastore is provisioned to the virtual disk files when the virtual machine is created. When the virtual machine writes new data to the disk for the first time, the blocks containing older data on the storage device are cleared.
▪Thick Provision Eager Zeroed — all the storage space on a datastore is provisioned to the virtual disk files when the VM is created. Blocks on the physical storage device are formatted with zeros to overwrite any older data.
▪Thin Provision — only a certain amount of storage space on a datastore is provisioned to the virtual disk files when the VM is created.
6)Review the deployment settings and click Finish.
7)A dialog box prompts after the deployment is completed successfully. Click Close.
Tip: To make the virtual machine automatically powered on after the deployment, you can select the Power on after deployment check box and skip step 3.
3.Click the ![]() icon from the toolbar to start the virtual machine manually if it is not powered on automatically.
icon from the toolbar to start the virtual machine manually if it is not powered on automatically.
4.Configure the Virtual Appliance.
Configuring the Virtual Appliance
Note: Make sure the time on the virtual machine is synchronous with the Internet time server.
1.Enter the username root and the default password admin at the VMware console to log in to the NetBrain Database Server.
Tip: It is highly recommended to change the password after completing the configuration.
Rocky Linux 8.5 (Green Obsidian)
Kernel 4.18.0-348.20.1.e18_5.x86_64 on an x86_64
netbrain-data-server login: root
Password:
Last Login: Mon Apr 12 12:33:05 on tty1
[root@netbrain-data-server ~]#
2.Configure a static IP address for your NetBrain Database Server as follows.
1)Run the ifconfig command to find your network interface name. In the following example, the network interface name is ens32.
Example:
[root@netbrain-data-server ~]# ifconfig
ens32: flags=4163<UP,BROADCAST,RUNNING,MULTICAST> mtu 1500
inet6 fe80::e80:8f64:655c:4c32 prefixlen 64 scopeid 0x20<link>
ether 00:0c:29:6e:55:29 txqueuelen 1000 (Ethernet)
RX packets 124 bytes 8200 (0.0 KiB)
RX errors 0 dropped 0 overruns 0 frame 0
TX packets 13 bytes 2334 (2.2 KiB)
TX errors 0 dropped 0 overruns 0 carrier 0 collisions 0
lo: flags=73<UP,LOOPBACK,RUNNING> mtu 65536
inet 127.0.0.1 netmask 255.0.0.0
inet6 ::1 prefixlen 128 scopeid 0x10<host>
loop txqueuelen 1 (Local Loopback)
RX packets 0 bytes 0 (0.0 B)
RX errors 0 dropped 0 overruns 0 frame 0
TX packets 0 bytes 0 (0.0 B)
TX errors 0 dropped 0 overruns 0 carrier 0 collisions 0
2)Run the vi /etc/sysconfig/network-scripts/ifcfg-<interfacename> command to edit the configuration file of the network interface and save the changes. <interfacename> is the network interface name you find in step 1). For how to modify the configuration file, refer to Editing a File with VI Editor.
Example: vi /etc/sysconfig/network-scripts/ifcfg-ens32
TYPE=Ethernet
PROXY_METHOD=none
BROWSER_ONLY=no
BOOTPROTO=static
DEFROUTE=yes
IPV4_FAILURE_FATAL=no
IPV6INIT=yes
IPV6_AUTOCONF=yes
IPV6_DEFROUTE=yes
IPV6_FAILURE_FATAL=no
IPV6_ADDR_GEN_MODE=stable-privacy
NAME=ens32
UUID=8c9772d4-99cd-4fb6-bf8a-c6d808ada124
DEVICE=ens32
ONBOOT=yes
ZONE=public
IPADDR=10.10.3.142
PREFIX=22
GATEWAY=10.10.7.254
DNS1=10.10.10.7
3)Run the systemctl restart network command to restart the network service.
4)Run the ifconfig command to check whether the IP configuration takes effect. If it does not take effect, restart the server, and then run the ifconfig command to check the IP configuration again.
3.Create a snapshot of the virtual machine in case you want to restore from a backup.
4.Run the ./configure_netbrain.sh command under the /root directory to configure NetBrain Database Server components.
1)Read the license agreement, and then type YES and press the Enter key.
2)Type I ACCEPT and press the Enter key to accept the license agreement.
[root@netbrain-data-server ~]# ./configure_netbrain.sh
Please read the End User License Agreement (“EULA”) for the license type (perpetual or subscription)
purchased in the order form at https://www.netbraintech.com/legal-tc/ carefully. I have read the
subscription EULA, if I have purchased a subscription license, or the perpetual EULA, if I have
purchased a perpetual license, at the link provided above. Please type “YES” if you have read the
applicable EULA and understand its and understand its contents, or “NO” if you have not read the
applicable EULA. [YES/NO]: YES
Do you accept the terms in the subscription EULA, if you have purchased a subscription license, or
the perpetual EULA, if you have purchased a perpetual license? If you accept, and to continue with
the installation, please type "I Accept" to continue. If you do not accept, and to quit the
installation script, please type "CANCEL" to stop. [I ACCEPT/CANCEL]: I ACCEPT
3)Configure the following parameters of NetBrain Database Server one by one with an interactive command line.
Install NetBrain Linux components.
The values in brackets are the default values of the parameters. To keep the default value for the current parameter, press the Enter key.
Please enter the IP address of this machine [10.10.3.142]:
Please create NetBrain service name [admin]:
Please create NetBrain service password:
Please re-enter NetBrain service password to confirm:
Use SSL on NetBrain Services? [no]: YES
Please enter the name and storage path of the certificate file that contains the public key:/etc/ssl/cert.pem
Please enter the name and storage path of the private key file:/etc/ssl/key.pem
Please enter the name and storage path of the Certificate Authority file:/etc/ssl/godaddychain-ca.crt
Use customized server ports? [no] YES
Please enter MongoDB port [27017]: 27018
Please enter License Agent port [27654]: 27655
Please enter Elasticsearch port [9200]: 9201
Please enter Rabbitmq port [5672]: 5673
Please enter Redis port [6379]: 6380
Please enter the URL (must end with /) to call NetBrain Web API service for the Service Monitor
[http(s)://<IP address or hostname of NetBrain Application Server>/]: https://10.10.3.141/
Note: For password criteria, please refer to: NetBrain Service Password.
Note: Keep notes of the username and password for your reference. The credentials are also required when you reconfigure the components.
4)After these parameters are configured, the key configurations for each component are listed for your further confirmation. To continue the installation with the current configurations, press the Enter key; to change any configurations, type no.
Note: The configure_netbrain.sh command can be executed multiple times to reconfigure any of the following parameters:
•Binding IP address
•Port
•Username/ Password
•Enable/ Disable SSL
•Replace certificates
Note: In the beginning of reconfiguration, the system will prompt you to enter the existing username and existing password. After the validation, follow Configuring the parameters of NetBrain Database Server.
MongoDB IP address: 10.10.3.142
MongoDB port: 27018
MongoDB username: admin
MongoDB password: ********
MongoDB uses SSL: yes
Certificate path: /etc/ssl/cert.pem
Key path: /etc/ssl/key.pem
Certificate Authority path: /etc/ssl/godaddychain-ca.crt
License Agent port: 27655
License Agent uses SSL: yes
Elasticsearch address: 10.10.3.142
Elasticsearch port: 9201
Elasticsearch username: admin
Elasticsearch password: ********
Elasticsearch uses SSL: yes
RabbitMQ address: 10.10.3.142
RabbitMQ port: 5673
RabbitMQ username: admin
RabbitMQ password: ********
RabbitMQ uses SSL: yes
Redis address: 10.10.3.142
Redis port: 6380
Redis password: ********
Redis uses SSL: yes
NetBrain Web API service URL: https://10.10.3.141/ServicesAPI
Do you want to continue using these parameters? [yes]
Tip: The messages and logs generated during the virtual appliance configurations are recorded in the /var/log/netbrain/installationlog/ova directory, which can be used for tracing and troubleshooting issues.
5.Run the following commands to verify the status of the MongoDB, License Agent, Elasticsearch, RabbitMQ, Redis, and Service Monitor Agent individually.
- systemctl status mongod
[root@netbrain-data-server ~]# systemctl status mongod
mongod.service - MongoDB service
Loaded: loaded (/usr/lib/systemd/system/mongod.service; enabled; vendor preset: disabled)
Active: active (running) since Mon 2021-04-12 23:19:10 EDT; 2min 4s ago
Main PID: 28363 (mongod)
Memory: 194.9M (limit: 17.1G)
...
- systemctl status netbrainlicense
[root@netbrain-data-server ~]# systemctl status netbrainlicense
netbrainlicense.service - NetBrain license agent service
Loaded: loaded (/usr/lib/systemd/system/netbrainlicense.service; enabled; vendor preset: disabled)
Active: active (running) since Mon 2021-04-12 23:19:10 EDT; 2min 4s ago
Main PID: 28894 (licensed)
Memory: 29.5M
...
- systemctl status elasticsearch
[root@netbrain-data-server ~]# systemctl status elasticsearch
elasticsearch.service - Elasticsearch
Loaded: loaded (/usr/lib/systemd/system/elasticsearch.service; enabled; vendor preset: disabled)
Active: active (running) since Mon 2021-04-12 23:19:10 EDT; 2min 4s ago
Docs: http://www.elastic.co
Main PID: 29089 (java)
Memory: 8.3G
...
- systemctl status rabbitmq-server
[root@netbrain-data-server ~]# systemctl status rabbitmq-server
rabbitmq-server.service - RabbitMQ broker
Loaded: loaded (/usr/lib/systemd/system/rabbitmq-server.service; enabled; vendor preset: disabled)
Active: active (running) since Mon 2021-04-12 23:19:20 EDT; 2min 58s ago
Main PID: 29454 (beam.smp)
Status: "Initialized"
Memory: 118.0M
...
- systemctl status redis
[root@netbrain-data-server ~]# systemctl status redis
redis.service - Redis
Loaded: loaded (/usr/lib/systemd/system/redis.service; enabled; vendor preset: disabled)
Active: active (running) since Mon 2021-04-12 23:19:01 EDT; 3min 27s ago
Main PID: 30099 (redis-server)
Memory: 13.7M
...
- systemctl status netbrainagent
[root@netbrain-data-server ~]# systemctl status netbrainagent
netbrainagent.service - NetBrain Service Monitor Agent Daemon
Loaded: loaded (/usr/lib/systemd/system/netbrainagent.service; enabled; vendor preset: disabled)
Active: active (running) since Mon 2021-04-12 23:19:09 EDT; 5min ago
Main PID: 30184 (python3)
Memory: 114.9M
...
Parameters
Refer to the following table for the parameters of the NetBrain Database Server.
Parameter |
Default Value |
Description |
|---|---|---|
Data path |
/var/lib/netbrain |
The directory to save data of all NetBrain Linux components. You can press the Enter key to keep the default path or type a new one. |
Log path |
/var/log/netbrain |
The directory to save logs of all NetBrain Linux components. You can press the Enter key to keep the default path or type a new one. |
IP address of this machine |
<current IP address automatically obtained from the machine> |
The binding IP address for MongoDB/ElasticSearch/NetBrain License Agent. It will be used for establishing connections with NetBrain Application Server. You can press the Enter key to keep the default value or type a new one. Note: 127.0.0.1 is not supported. Note: If you configured multiple network cards on this machine, type the designated IP address to be bound. |
NetBrain service username |
admin |
The admin username and password created for MongoDB, Elasticsearch, RabbitMQ, Redis, Front Server and Service Monitor. Note: The password must meet the following criteria: Note: The username must meet the following criteria: Note: Keep notes of the NetBrain service username and password because they will be used for validating the connections with: |
NetBrain service password |
|
|
Use SSL on NetBrain Services |
no |
Whether to enable SSL for all components on NetBrain Database Server. To enable SSL, type yes.
|
Certificate file path |
|
The file name of the certificate file that contains the public key. Note: It is required only if Use SSL on NetBrain Services is enabled. |
Private Key file path |
|
The file name of the private key file. Note: It is required only if Use SSL on NetBrain Services is enabled. |
Certificate Authority file path |
|
The name and directory of the chain certificate authority (CA) file, which is used to authenticate the CA issuing the SSL certificates. Note: It is required only if Use SSL on NetBrain Services is enabled. |
Use customized server ports? |
no |
Whether to use customized port number for each Linux component. To customize ports, type yes. |
MongoDB port |
27017 |
The port number that the MongoDB service listens to. You can press the Enter key to keep the default port or type a new one. Note: Make sure the port is not used by other applications. Note: Keep notes of the customized port because it will be used for validating the connections with MongoDB when installing NetBrain Application Server. |
License Agent port |
27654 |
The port number that the License Agent service listens to. You can press the Enter key to keep the default port or type a new one. Note: Make sure the port is not used by other applications. Note: Keep notes of the customized port because it will be used for validating the connections with License Agent when installing NetBrain Application Server. |
Elasticsearch port |
9200 |
The port number that the Elasticsearch service listens to. You can press the Enter key to keep the default port or type a new one. Note: Make sure the port is not used by other applications. Note: Keep notes of the customized port because it will be used for validating the connections with Elasticsearch when installing NetBrain Application Server. |
Rabbitmq port |
5672 |
The port number that the RabbitMQ service listens to. You can press the Enter key to keep the default port or type a new one. Note: Make sure the port is not used by other applications. Note: Keep notes of the customized port because it will be used for validating the connections with RabbitMQ when installing NetBrain Application Server. |
Redis port |
6379 |
The port number that the Redis service listens to. You can press the Enter key to keep the default port or type a new one. Note: Make sure the port is not used by other applications. Note: Keep notes of the customized port because it will be used for validating the connections with Redis when installing NetBrain Application Server. |
URL to call NetBrain Web API service for the Service Monitor |
http(s)://<IP address or hostname of NetBrain Application Server>/ |
The URL to call NetBrain Web API service. For example, http://10.10.3.141/ or https://www.YOURCOMPANY.com/. Note: If SSL will be enabled with https binding created for the system website in IIS Manager, type https in the URL. Note: When you type https in the URL, the CA verification will not be performed during the configuration by default. To verify the CA certificate, complete the following steps after the configuration: 1)Run the cd /etc/netbrain/nbagent command to navigate to the /etc/netbrain/nbagent directory. 2)Run the vi agent.conf command to edit the agent.conf file as follows and save the changes. For more details on how to edit the file with the vi editor, refer to Editing a File with VI Editor. ▪Modify the value of the enable_ssl_validation parameter to True. ▪Remove the pound sign (#) in front of the cert_path parameter, and then enter the path of the CA certificate file. Example: # enable ssl validation (default:False) 3)Upload the CA certificate file under the specified path. Make sure the CA certificate could be accessed and read by the Service Monitor Agent Service. |