Scheduling CLI Command on Single Device

Contents
This topic introduces the following two methods to schedule CLI commands on a single device:
•Via Schedule CLI Commands Tab in NetBrain Workstation (by End User & Power User)
•Via Smart CLI Application (by End User)
Via Schedule CLI Commands Tab in NetBrain Workstation
1.Click  on the task bar and select Proactive Automation Manager from the drop-down menu.
2.From the Schedule CLI Commands tab, select a device to view the existing scheduled CLI commands of this device.
3.Click Add Commands hyperlink to schedule more CLI commands on this device. Enter CLI commands, description.

4.Select a frequency, and then click Submit.
Note: Each device has three built-in timer-based flash probes: High, Medium, and Low (by default). These three built-in probes can be used for scheduling CLI command. The default frequency is low and it can be modified to suit your specific needs. If you have purchased the Intent-based Automation License, you will be able to customize a separate new timer-based flash probe and use it here. See Defining Timer-based Flash Probe for more details.
5.After clicking Submit, the following two additional checks will be performed:
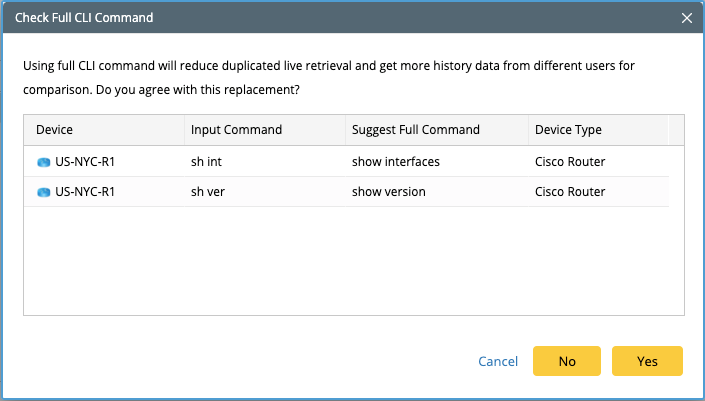
Check Full CLI Commands
When entering CLI commands, network engineer is often used to abbreviate commands. For example, ‘show ip interface’ is often abbreviated as ‘sh ip int’, and ‘show version’ is abbreviated as ‘sh ver’. In the NetBrain Workstation, there is a full command list, which can convert the abbreviated short command into a complete full command, so that different short command abbreviations can be unified into the same full command for storage and comparison.
Check Conflict
NetBrain will check whether the schedule CLI command being added conflicts with the existing schedule CLI command. The mechanism behind is using [Device + Full command] as the key and check whether there is a conflict in Frequency or in Description. If there is a conflict, warnings will prompt as follows:
Via Smart CLI Application
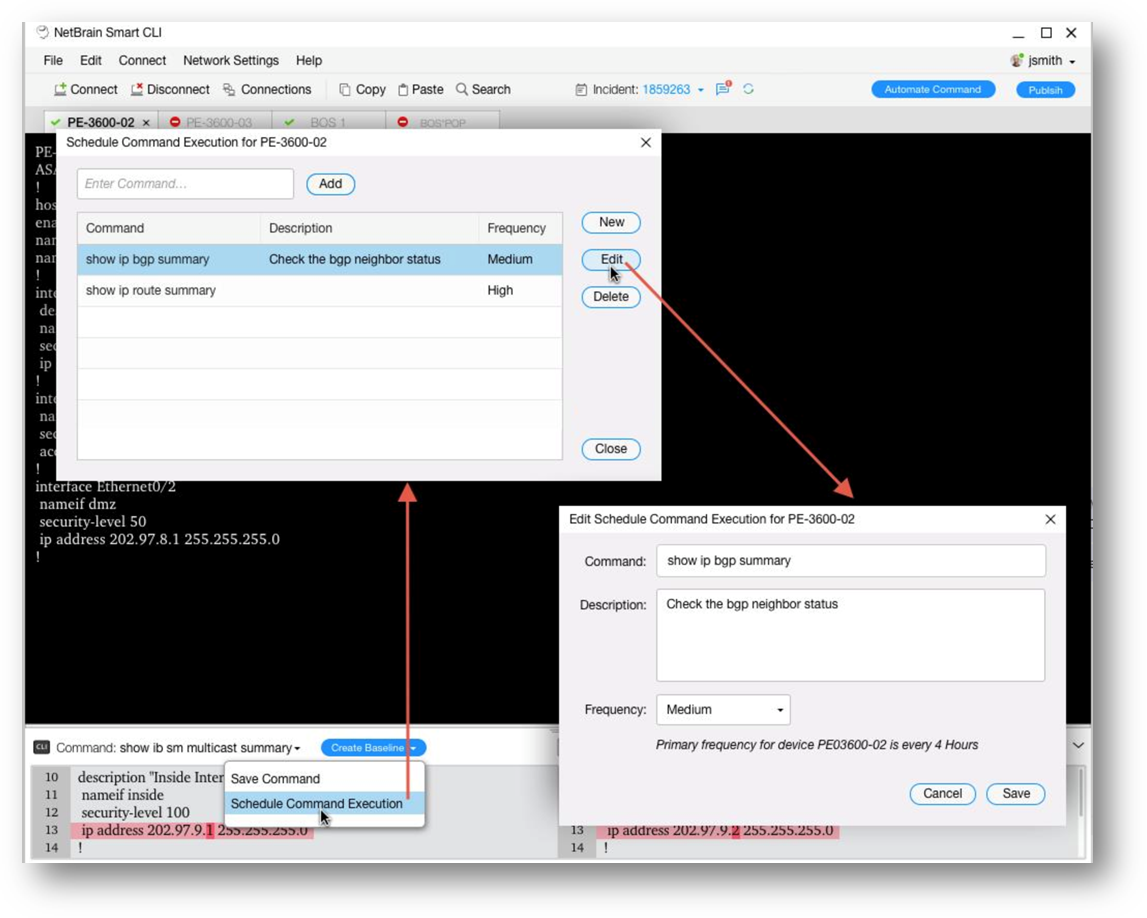
In addition to using the NetBrian Workstation, CLI commands can also be scheduled from NetBrain Smart CLI application.
To schedule CLI commands from Smart CLI, you need to first install and set up the Smart CLI application on Windows, ensuring the Smart CLI application and the IE system can establish connection with each other. See Scheduling Command Execution in Smart CLI for detailed operational steps.
Smart CLI will log into the device and issue CLI command to check the device status. In the scenario of troubleshooting, you can check whether the CLI command entered has respective historical results. If the historical results exist, you can use the compare function to quickly find out where changes have occurred thus improve the troubleshooting efficiency; if the historical results do not exist, and you believe this CLI is worth benchmarking, then you can schedule one or more CLI commands for this device.
See also:
Defining Timer-based Flash Probe
Scheduling Command Execution in Smart CLI
Auto Cleaning Historical Data