R11.0a-March2023
View Map Devices and the Matched NITs
The map devices and their automatically matched NITs are organized into a tree structure in the left NIT/Device Pane.
Two modes are provided to the folder tree structure in the left pane, View By Intent and View By Device. You can switch between the two modes to change the view as needed.
- View by Device (the default mode): Map Devices are the parent nodes. You can view the matching relationship between the Device and the NIT.
- View by Intent: The NITs will serve as the parent node. You can quickly select intents to run on all the matched devices. This mode is selected in most of the application scenarios.


Note: Only the NITs whose Auto Intent function is enabled in the Intent Library will be displayed in the pane (See Enable Auto Intent for more information). 
Operations on the NIT/Device pane
You can perform the following actions in the NIT/Device pane:
- Add Device: By default, the devices listed in the left pane are all those map devices with at least one NIT matched. You can add more devices by clicking Add Device and selecting the devices in the pop-up window.

- Refresh: The relationship between devices and NITs in the left pane can be updated by clicking the
 icon. This action can also add devices that are newly added to the map but not included in the list.
 - Filter: In some cases, there may be too many NITs, but not all the NITs are of interest. You can filter the intents as follows:
- Click the
 icon.
icon.
- Select a filter mode from the pop-up dialog.

- Filter by Seed Intent: Only the NITs from the selected seed intents will be listed in the pane.
- Filter by Incident Type: Only the intents installed with the selected incident types will be listed in the pane.
- Filter by Probe: Only the intents installed with the selected probes will be listed in the pane.
- Select the checkbox of the corresponding items as a filter.
- Click OK.
- Search: The system provides the function of searching devices and intents.
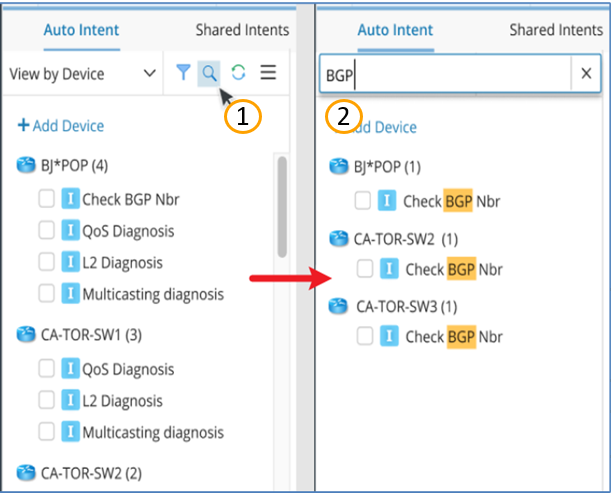
- Click the
 icon.
icon. - Enter a search keyword such as NI name from the pop-up dialog to search (The system supports NI Name/Device Name as the search keywords).
Tip: Click the × icon to exit the search mode.