Optional Settings
You can define the following optional settings for an observability dashboard in the edit mode.
Define a URL
The hyperlink can serve as a supplement to the description, providing extra information for the observability dashboard.
- Click Undefined.
- In the Define URL window, you can link the observability dashboard to an incident, a map, or a customized URL.

Add a Top-N Chart
You can add a top-n chart by clicking the +Add Chart and selecting Top-N Chart. 
- Title: Define the title of the top-n chart.
- Chart Data: Define how many devices will be displayed in the chart. (Device number: between 1 and 50)
- Data Scope: Define the scope of the data source.
- All Dashboard Groups: Data from all result detail charts in this observability dashboard.
- Specific Dashboard Groups: Data from specified result detail charts in this observability dashboard. Users will be able to select from existing result detail charts.
- Click +Select.
- In the Select Chart window, select the desired charts and click OK.
- Click Apply.
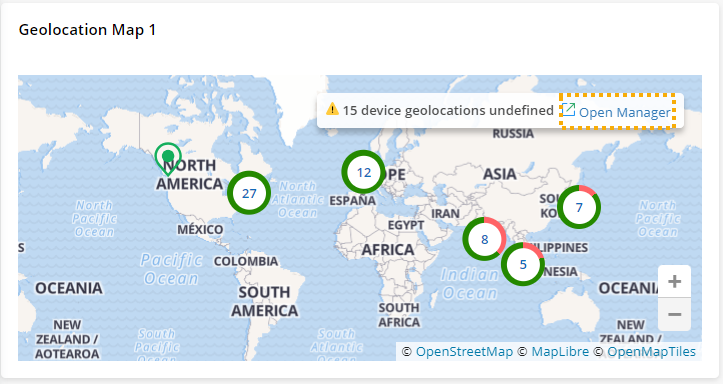
Add a Geo-Map Chart
Geolocation Map helps visualize the geographic locations of devices, making it easier to troubleshoot network issues that might be region-related.
Follow the steps to add a geo-map chart in an observability dashboard:
Define the Geolocation of Devices
Defining the geolocation of devices is necessary before using a Geo-map Chart.
- Click the start menu, and navigate to Geolocation Manager.
- On the Manage Address tab, you can manage and add all geolocations and give geolocations an easily recognizable name.
- To add manually, click Add Address. On the Define Geolocation window, choose either of the two options to define the geolocation.
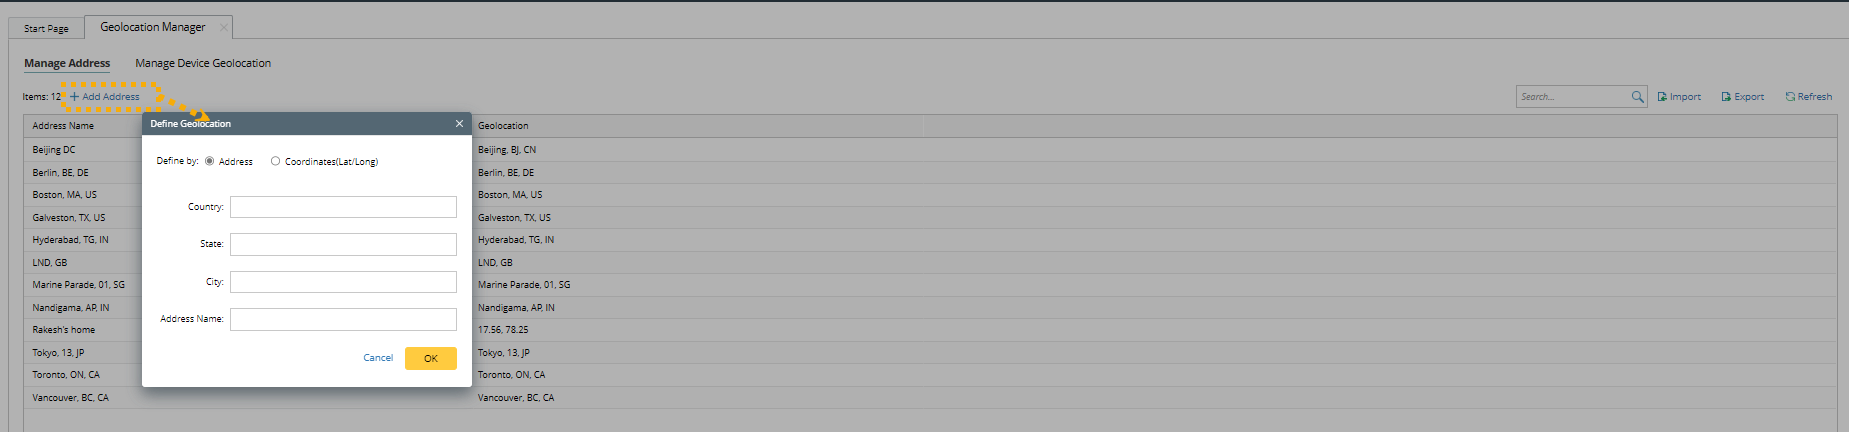
- Option 1: Define by Address: Enter the country, state, and city. Click OK.
Example: You can modify the Address Name as Boston Data Center. - Option 2: Define by Coordinates (Lat/Long): Enter the latitude and longitude; Modify the Address Name if needed. Click OK.

Note: The address name must be unique.
- Option 1: Define by Address: Enter the country, state, and city. Click OK.
- To batch import geolocations, click Import. To be successfully imported, the CSV file must have two column headers: Address name and Geolocation.
- To add manually, click Add Address. On the Define Geolocation window, choose either of the two options to define the geolocation.
- On the Manage Device Geolocation tab, associate devices with an address.
- To associate manually, click Add Device Geolocation.

- Click Select> Select devices in the Select Devices window.
- Select an address previously added on the Manage Address tab.
- To batch import, click Import to import a CSV file. To be successfully imported, the CSV file must have at least two column headers: Hostname and Address Name.
- To associate manually, click Add Device Geolocation.
Add Geo-Map Chart in Observability Dashboard
- In the edit mode of an observability dashboard, click Add Chart> Geolocation Map Chart.
- Edit the Title and Data Scope per the requirement.
- Click Appy.

- For devices with no geolocation defined, you can define them in the Geolocation Manager.
Change the Logo
You can replace the default logo with a customized logo of their company. Click the default icon to open the Customize Logo window.
Hide Empty Rows
You can hide rows with no data to eliminate distractions in the dashboard, helping viewers concentrate on essential information. You can also show these rows for more details. 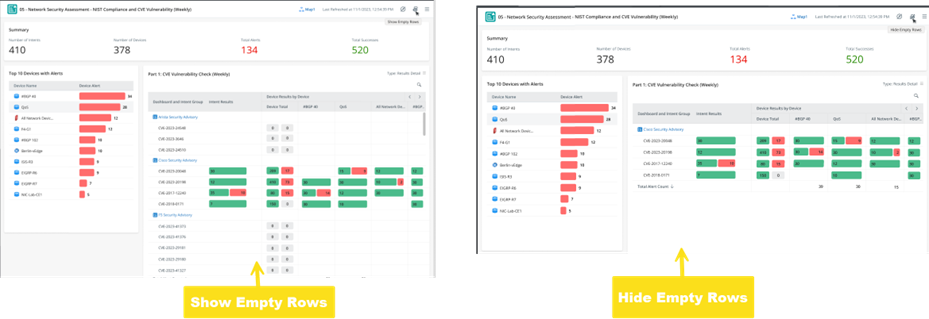
|
Tip: By default, the empty rows are displayed when users first open the dashboard. |
| In Edit Mode | In View Mode | |
|---|---|---|
| Hide/Show Empty Rows |
|
|
 and select Display Settings.

