R12 Publication-2025July16
Discovering Network via Seed Routers
A seed router is the starting point where the discovery begins. With the seed router method, all the discovered neighbor devices will be treated as new seeds until all devices matching the defined Discovery Depths are discovered. The system lets you to discover all the neighbor devices from the route tables, NDP tables, and SNMP routing protocol neighbors.

|
Note: The neighbor walking mechanism does not support IPv6 addresses. |
- Log in to the Domain Management page.
- On the Domain Management page, click Discover on the Start Page.
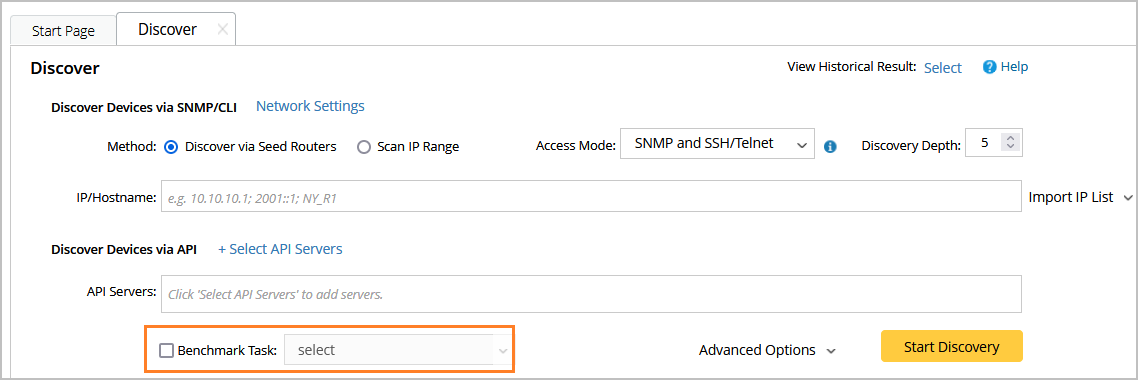
- On the Discover tab, the method Discover via Seed Routers is selected by default. Select one of the following ways to enter one or multiple seed routers:

- Enter seed IP addresses directly in the blank field, separated by semicolons. The live network discovery starts from these IP addresses.
- If you already have any devices discovered in your domain, click Import IP List>Select Devices.
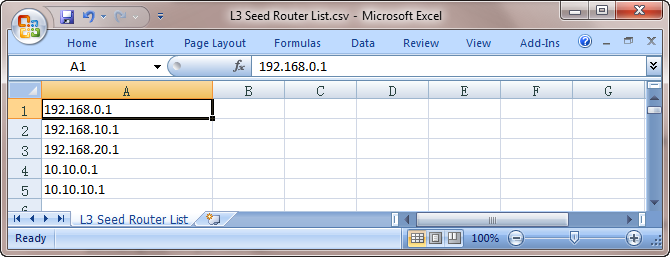
- Import a .csv or a .txt file by clicking Import IP list. Here is a sample list for your reference:
- Discover Devices via API: refer to SDN and public cloud discovery for details.
- SNMP and Telnet — retrieve vendor and model information via SNMP first, and then log in to devices by using Telnet to retrieve live data.
- SNMP and SSH — retrieve vendor and model information via SNMP first, and then log in to devices by using SSH to retrieve live data.
- SNMP and Telnet/SSH — retrieve vendor and model information via SNMP first, then log in to devices using Telnet to retrieve live data; if Telnet doesn't work, then use SSH.
- SNMP and SSH/Telnet — retrieve vendor and model information via SNMP first, and then log in to devices by using SSH to retrieve live data; if SSH doesn't work, then use Telnet.
- SNMP Only — retrieve live data via SNMP only.
Note: The data retrieved via SNMP only might be incomplete.
- Set the discovery depth by entering a value between 0 and 255.
It refers to how deep you want the discovery to go. That is, how many levels of neighbors are explored from the seed router (the neighbors can include NDP neighbors, routing protocol neighbors, and next-hops in route tables, which depend on your configurations). Here is a sample for discovery depth.
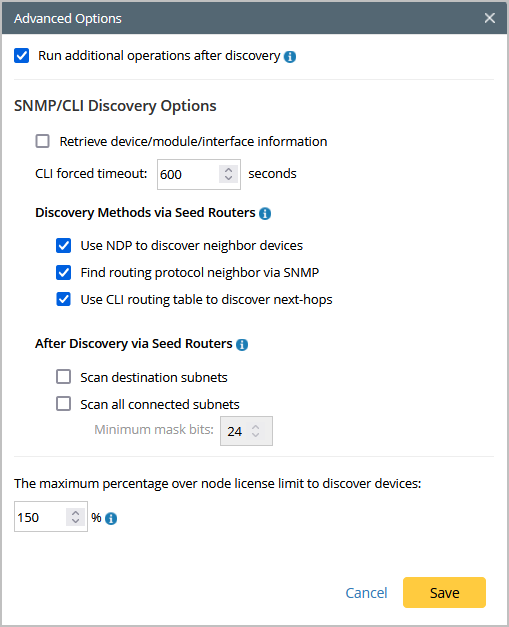
- Click Advanced Options to configure more settings:
- Run additional operations after discovery — choose whether to run the additional operations for the discovery, including updating the sites, etc. It is recommended to keep this option checked.
- Retrieve device/module/interface information — choose whether to retrieve the device/module/interface information for certain discovery (for example, AWS discovery to merge the multi-source devices and Juniper discovery for complete MIB information).
- CLI Forced Timeout — the time limit of each CLI command to retrieve live data from a device. The default value is 600 seconds.
- Discovery Methods via Seed Routers: It is recommended to check all three options.
- Use NDP to discover neighbor devices — discover neighbor devices by looking up an NDP table.
- Find routing protocol neighbor via SNMP — retrieve routing protocol (such as BGP, EIGRP, and OSPF) neighbors via SNMP.
- Use CLI routing table to discover next-hops — discover neighbor devices from route tables retrieved by CLI commands.
- Scan destination subnets — continue to scan all destination subnets in the route tables of the devices discovered in the last depth.
Note: The option is only available when the Use CLI routing table to discover next-hops option is selected. If this option is enabled, the system may take a long time to finish. For the first-time discovery, it is not recommended to enable this option.
- Scan all connected subnets — continue to scan all directly connected subnets of the devices discovered in the last depth.
- Minimum mask bits — scan subnets with mask exceeding the threshold. The default value is 24 and can be configured between 22 and 32.
- The maximum percentage over node license limit to discover devices — This ratio represents the max percentage of devices that the domain will discover once the node license limit is exceeded. 0 means the system will stop discovering when the discovered device number equals the license limit.
- To specify the proxies and credentials to be used in the discovery, click Network Settings to adjust.
- Select a Benchmark task you wish to execute right after the Discover task to update device data like topology and MPLS cloud. The discovered devices are not ready to use in features like maps or paths until the Benchmark finishes. You can also skip this step and leave it for the next scheduled System Benchmark.