R12.1-2025June05
Install Smart CLI on Windows
NetBrain Smart CLI is supported on the following operating systems. You can also install NetBrain API Server and Smart CLI on the same Windows server.
- Windows 11 Professional Edition
- Windows 10 (Business/Enterprise Edition)
- Windows Server 2016 (Standard/Datacenter Edition)
- Windows Server 2019 (Standard/Datacenter Edition)
- Windows Server 2022 (Standard/Datacenter Edition)
- Windows Server 2025 (Standard/Datacenter Edition)
- macOS (Catalina 10.15 and Higher)
- Linux (Ubuntu 22.04/20.04/18.04)

|
Note: NetBrain Smart CLI is not supported on the Education version for Windows. |
- Download the Smart CLI installation package from NetBrain login page to a local directory.

Tip: You can also download the Smart CLI installation package from the system's main UI or by right-clicking a device on a map.
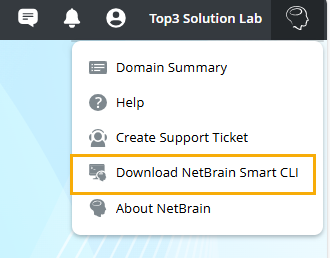

- A Download NetBrain Smart CLI window pops up:

- To auto-download: Click Download, the download webpage will open, and the download will start automatically.
- To download manually: Click Open Website, the download webpage will open, and you can perform the download from the download button at the top or by clicking an appropriate download link in the table.

- Extract installation files from the netbrain-smartcli-windows-x86_64-12.1.zip file.
- Right-click the netbrain-smartcli-windows-x86_64-12.1.exe file, and then select Run as administrator to launch the Installation Wizard.
- On the Welcome page, click Next.
- On the System Configuration page, review the system configuration summary, and click Next.
- On the Customer Information page, enter your company name, specify the target users who can run the Smart CLI application after the installation, and then click Next.
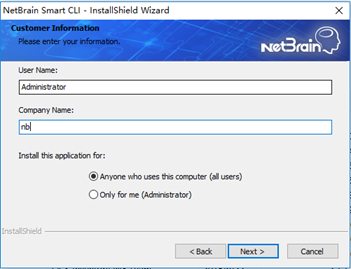
Tip: To make the application only available for the administrator, click Only for me (Administrator). - On the Destination Location page, click Next to install Smart CLI under the default directory C:\Program Files\NetBrain\. If you want to install it under another location, click Change.
- Keep the Create desktop shortcuts check box selected to create a shortcut on your desktop to quickly launch Smart CLI, and then click Next.
- Review the summary of the installation settings and click Install.
- After Smart CLI is successfully installed, click Finish to complete the installation process and exit the Installation Wizard.