R12.1 Project Publication-2025Dec23
Check the Configlet and View Golden Config Verification Results
Result Tab: Color Codes and Actions in the Table Area
After building the Configlet node, the Result tab displays a table that cross-references selected target devices with golden config rules and config parser variables. The table cells are filled with color-coded blocks to indicate the verification and parsing results.
Color Codes in the Table Area:
-
Golden Config Rule Columns
- 🟩 Green (Success): The device's current configuration matches the golden config.
- 🟥 Red (Alert): The device's current configuration does not match the golden config.
- ⬜ Blank: The golden config rule does not apply to the device.
-
Config Parser Variable Columns
- 🟦 Blue: Configlet are successfully parsed for the device.
- ⬜ Blank: The config parser variable does not apply to the selected device.

|
Note: By default, the first device in the table is selected, and its detailed results are shown in the Configlet Result Area below the table. |

Viewing Detailed Results in Configlet Result Area
- Select a Device Row: Displays all golden config check results and config parser variables for the selected device.
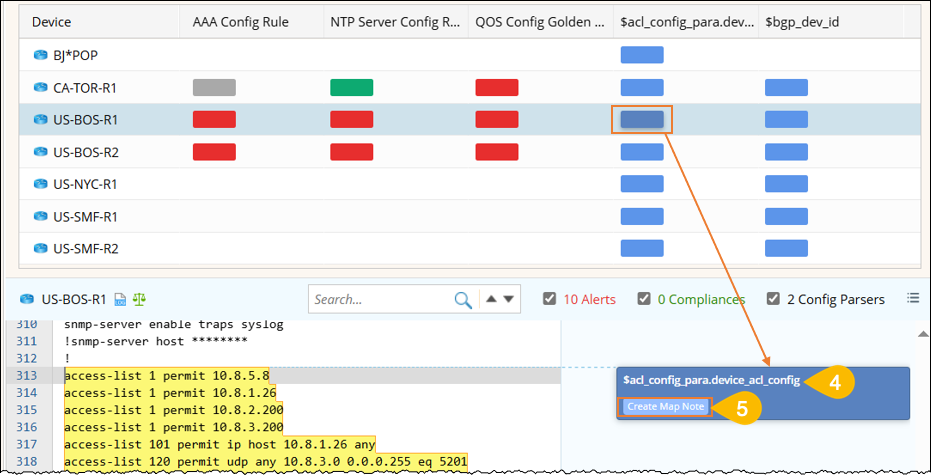
- Click a Color Block: Directly locates the associated golden config result or parser output.
-
Filtering Options: Use the check boxes above the result area to filter the output:
- Alerts: Show only golden configs that failed verification.
- Compliances: Show only golden configs that passed verification.
- Config Parsers: Show number of parsed config variables.
- View Config Parser Variables: Parser variables matched with the current device will be displayed in the Configlet Result Area.
- Create Map Note for Parser Configlet: The config lines matched by the config parser variable can be saved as a device note and shown on the map. The note title uses the corresponding parser variable column name.

Managing Configlet Results
Each time the Configlet Node is built, a new result is saved and timestamped.
- The timestamp appears in the Result Tab title. You can switch the time stamps to view different results.
-
Available actions in the Result tab menu (
 ):
):
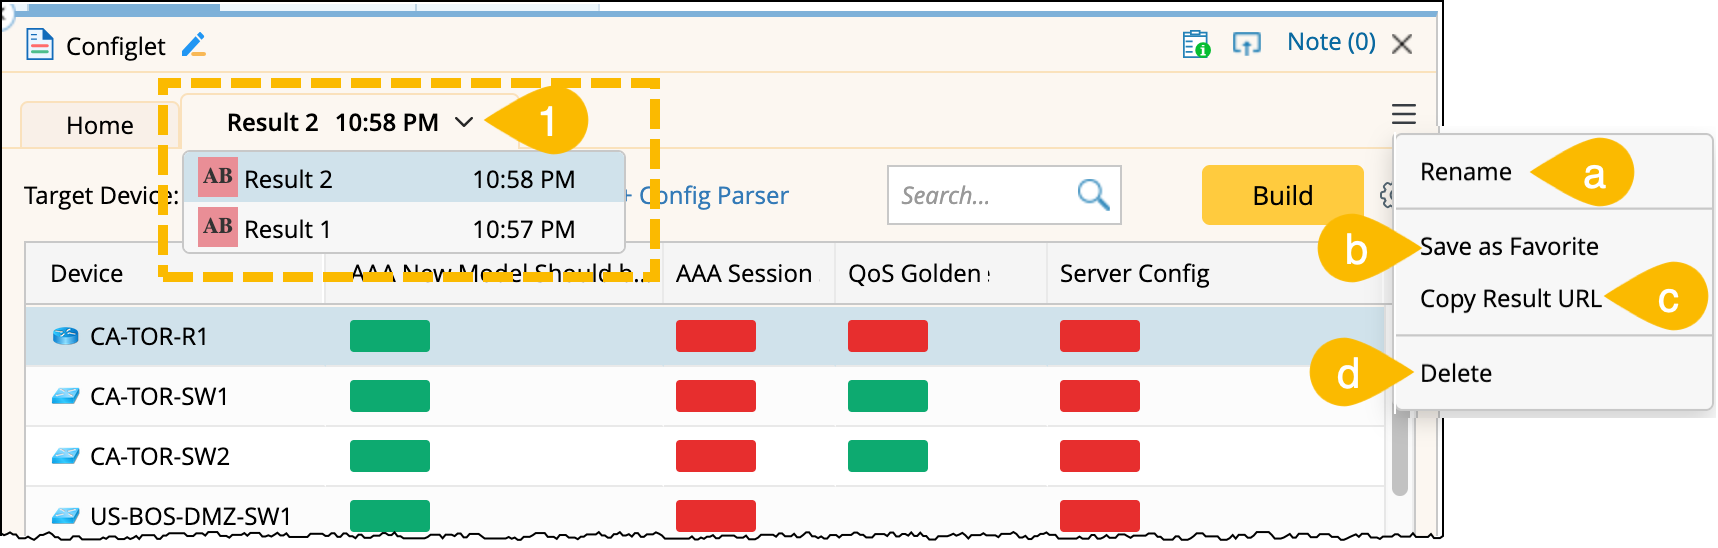
- Rename: Assign a custom name to the result tab. The original timestamp remains visible.
-
Save as Favorite: Bookmark the node result for easy access.

- Copy Result URL: Copy the result’s unique URL to share or open it in a separate browser tab.
- Delete: Permanently remove the result.