Configure Interactive Prompts and Commands
The system provides a set of prompts and commands for each device type in the driver. During the live access process, the system determines which command to send depending on different command prompts. However, the built-in prompts and commands may not fit in some special scenarios, which may cause failures. To tackle with this issue, you can customize these prompts and commands for a single device in device settings.
- Configuring Prompt and Command Pairs for Login Modes
- Configuring Prompt and Command Pairs for Live Data Retrieval

Note: The prompts and commands customized in the Shared Device Settings of a device take priority over those defined in Device Driver.
Configuring Prompt and Command Pairs for Login Modes
2. In the Shared Device Settings of the device, click Advanced on the CLI tab.
3. Toggle the switch to enable the login script.
- Add prompts and commands on GUI
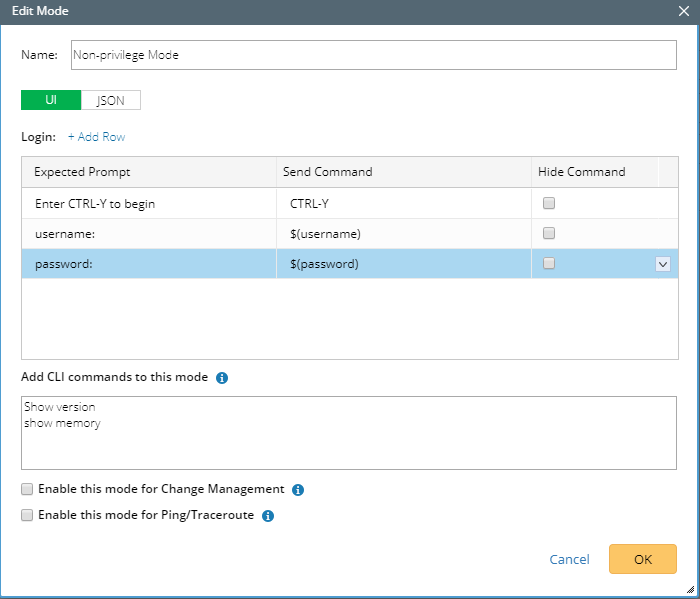
On the UI tab, click Add Row to add a new pair of prompt and command..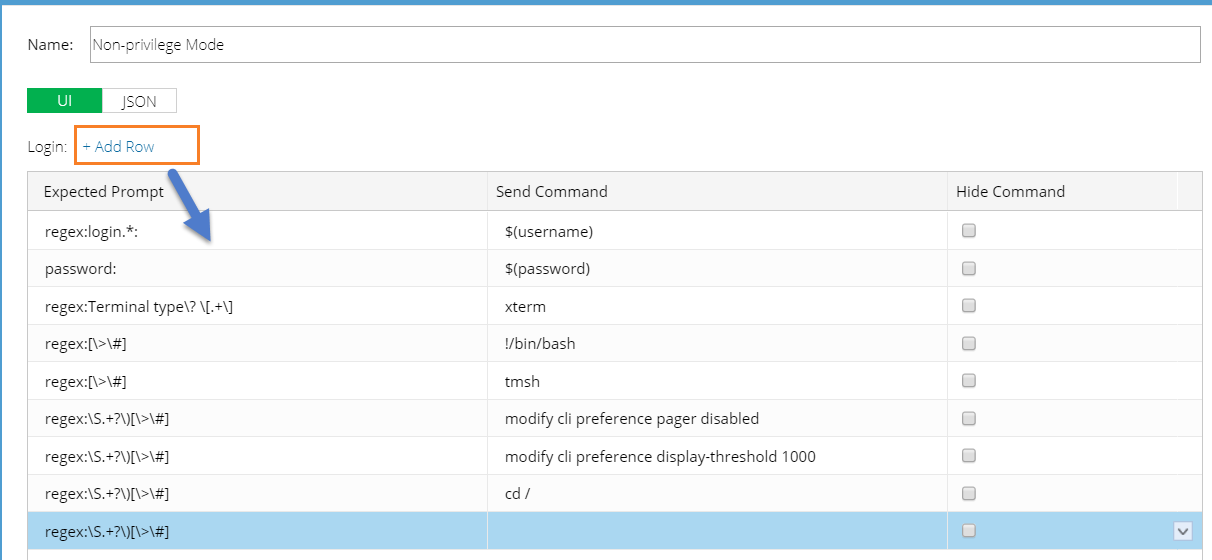
The definition contains three fields:
| Field | Description |
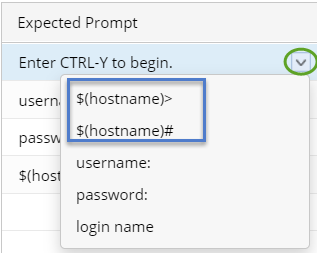
| Expected Prompt | A prompt to require a command input to continue the login process, such as the prompt Enter CTRL-Y to begin that you may encounter when logging to some Avaya switches.
Note: The prompt cannot be empty and cannot exceed 255 characters. |
| Send Command | The corresponding command that the system sends out after receiving an expected prompt.
Note: The command cannot be empty and cannot exceed 255 characters. |
| Hide Command | Show the content in the Send Command column as ciphertexts. |

On the JSON tab, configure the prompts and commands by using JSON scripts. The JSON definition contains the following elements:
Sample JSON Script:
| |||||||||||||||||
| Note: The content defined on the UI tab and JSON tab is synchronized with each other. Therefore, you can select either way to define prompts and commands for only once.
|

|
|
Tip: The system will use this key to verify with the Fingerprint Key on the device when logging in to the device through SSH. If the verification fails, the failed device and the Fingerprint Key will be recorded in Domain Management > Data Accuracy Resolution > SSH Fingerprint Check Failed Table. |
Configuring Prompt and Command Pairs for Live Data Retrieval
|
|
Note: Use || to separate multiple expected prompts. For more rules and formats, refer to Prompt and Command Definition on GUI. |
Supported Key and Combination Key Commands
On devices of some vendors, a key or combination key requires to be sent during the login process. The system supports the following types of keys and combination keys.
| No. | Key/Combination Key | Description |
| 1 | [Ctrl+Y] | The Ctrl+Y command is sent. Y is a letter in a lower or upper case from A to Z. |
| 2 | [Shift+Y] | The Shift+Y command is sent. Y is a letter in a lower or upper case from A to Z. |
| 3 | [Alt+Y] | The Shift+Y command is sent. Y is a letter in a lower or upper case from A to Z. |
| 4 | [Ctrl+Shift+Y] | The Ctrl+Shift+Y command is sent. Y is a letter in a lower or upper case from A to Z. |
| 5 | [Ctrl+Alt+Y] | The Ctrl+ALT+Y command is sent. Y is a letter in a lower or upper case from A to Z. |
| 6 | [Shift+Alt+Y] | The Shift+ALT+Y command is sent. Y is a letter in a lower or upper case from A to Z. |
| 7 | [Ctrl+Y, X] | This command includes pressing the Ctrl +X combination key and then pressing the Y key separately (without holding Ctrl +X).
|
| 8 | [Ctrl+Y, Ctrl+X] | The Ctrl +Y+X command is sent.
|
| 9 | [Esc] | The Esc command is sent. |
| 10 | [Enter] | The Enter command is sent. |
| 11 | [Space] | The Space command is sent. |
| 12 | [Y] | The Y command is sent. Y is a letter in a lower or upper case from A to Z. |
| 13 | [Ctrl+\]] | The Ctrl+] command is sent. Because the system uses [ ] to include a key or combination key, the escape character \ is used to avoid the conflict of the ] character. |
|
|
Notes:
|