Configure SSO Authentication
- Log in to System Management Page.
- On the System Management page, click User Accounts > External Authentication.
- Click the
 icon and select Add SSO Authentication from the drop-down list.
- Assign user role. The system provides two approaches to assigning user role: Assign user role manually, Map user role from IDP to NetBrain.
To manually assign user role, check the Assign user role manually checkbox, then define the following:- Enter a unique name to identify the SSO server and a brief description.
- (Optional): Click Upload Logo, then select an image as the logo.
- Enter the credentials to connect to the SSO server in the left area of the pane. See SSO Server Settings for more details.

- Assign the access permissions, roles and privileges to the user account on the SSO server in the upper-right area:
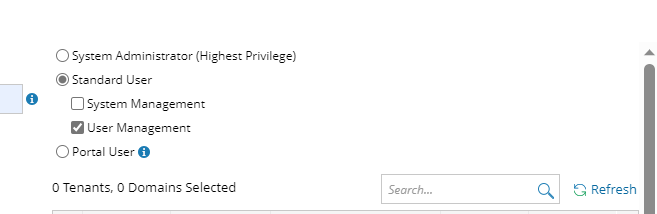
- System Admin — click to assign the system administrator role to the user accounts. For the detailed privileges of System Management and User Management, refer to Featured Management Privileges.
- Assign user roles that have access permission to tenants and domains. Click Select in the right area to select the tenants and domain, then define the access settings in the table node structure below by checking checkbox.
- Tenant Access — select one or more tenants to assign access permissions to the user accounts.
- Tenant Admin — select one or more tenants to assign the tenant administrator role to the user accounts.
- Allowed to Create Domain — select the check box to assign the domain creation permission to the user accounts.
- Domain Access — select one or more domains to assign access permissions to the user accounts.
- Domain Privileges — click Assign Privileges to assign more domain privileges to the user accounts by role. See Configure Share Policy for more details.

Note: To prevent the assigned roles and privileges of an external user account from being synced with any changed authentication settings, you can lock the user rights as follows as soon as the user has logged in to the NetBrain System. See Create User Account for more details. 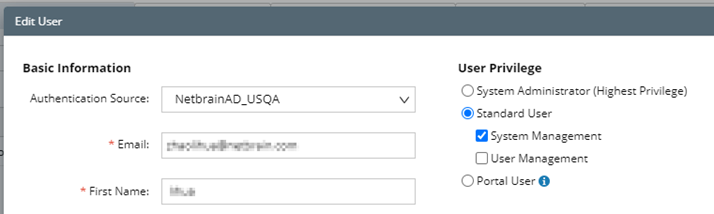
To assign user role by mapping user role from IDP to NetBrain, check the Map user role from IDP to NetBrain checkbox, then define the following:
- Enter a unique name to identify the SSO server and a brief description.
- (Optional): Click Upload Logo, then select an image as the logo.
- Enter the credentials to connect to the SSO server in the left area of the pane. See SSO Server Settings for more details.
- Click Add Mapping to add mapping from IDP to NetBrain:

- Enter name and attribute name, attribute value (these information are obtained from SAML information of third party system).

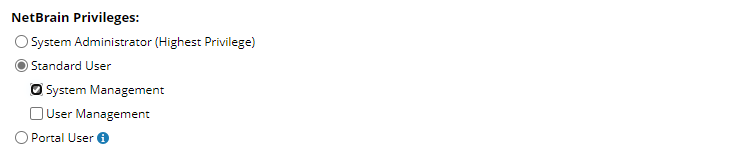
- Select the privilege for the user role (system admin privilege, system management privilege, user management privilege, portal user privileged).
- Select Tenant and Domain that the user Role can access.
- Select the Tenant and Domain.

- Click Assign Privileges to assign privilege. Check the checkbox of a Role (for example, Engineer), then the corresponding privileges for this role are listed below.
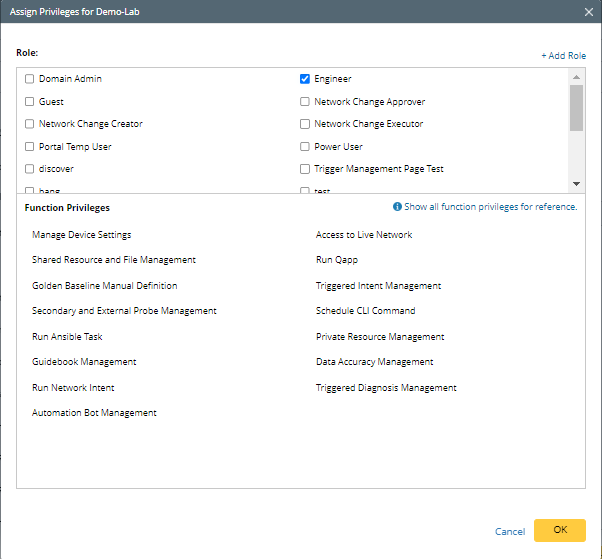
- Click OK to close the Add mapping and set privileges dialog.
- Select the Tenant and Domain.
- Enter name and attribute name, attribute value (these information are obtained from SAML information of third party system).
- Click Save.
|
|
Tip: You can click Download metadata to download the SAML metadata of NetBrain Service Provider, which contains entityID, endpoints (Attribute Consume Service Endpoint, Single Logout Service Endpoint), public X.509 certificate, nameID format, organization information, and so on. |
SSO Server Settings
The following table lists the credentials required when connecting to an SSO server.
|
|
Note: To ensure the X.509 certificates can be deployed on IIS, go to IIS Manager > Application Pool > Advanced Settings > Process Model and set Load User Profile to True. |
| Field | Description | ||
| SAML Version | The version of SAML used by your Identity Provider. Currently, SAML 2.0 is supported. | ||
| Entity Id | The unique identifier of the Identity Provider. | ||
| Identity Provider Certificate | The X.509 certificate containing the public key to verify the SAML 2.0 messages signed by the Identity Provider, such as the Assertion and LogoutRequest/LogoutResponse. Click Browse to upload the certificate.
| ||
| Request Signing Certificate | The X.509 certificate containing the public key and private key to sign outgoing SAML 2.0 messages and decrypt incoming SAML 2.0 messages encrypted by the Identity Provider, such as the Assertion/NameID/Attribute elements inside an SSO Response. The certificate with password is supported. Click Browse to upload the certificate.
| ||
| Certificate Password | The password of the certificate (pfx). | ||
| Want AuthnRequests Signed | Set whether to sign the SAML authentication request with the NetBrain certificate.
| ||
| Request Signature Method | The signing algorithm to encrypt the messages sent to the Identity Provider. The available options include:
| ||
| NameID Format | The name identifier formats supported by the Identity Provider. Name identifiers are a way for providers to communicate with each other regarding a user. SSO interactions support the following types of identifiers:
| ||
| Service Binding | The binding used to send the login request to the Identity Provider. The available options include:
| ||
| Identity Provider Login URL | The Login Service URL where the Identity Provider will redirect the user during the login exchange. | ||
| ArtifactResolve URL | The Artifact Resolution Service (ARS) URL to send back-channel requests to resolve artifacts received from NetBrain. | ||
| Logout Service Binding | The binding used to send the logout request to the Identity Provider. The available options include:
| ||
| Identity Provider Logout URL | The Logout Service URL where the identity Provider will redirect the user during the Logout exchange. | ||
| Custom Attribute Mappings | Define the attributes (user information) of a user for mapping the user role.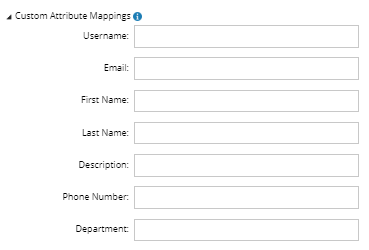 |