Installing Index Server on Linux

Contents
NetworkBrain Index Server adopts Elasticsearch as a full-text search and analytics engine in a distributed multi-user environment.
1.Prepare a Linux server. See System Requirements for more details.
Note: Don't use the machine on which Elasticsearch from other channels has been installed.
2.Log in to the Linux server as root user, and then open a command prompt.
Note: Index Server has a dependency on jdk1.8.0_131, which will be automatically installed during Index Server installation. To check if another JDK version is installed on this machine, run the java -version command.
- If the returned result shows java version "1.8.0_131" or command not found, continue with step 2.
- If the returned result shows another JDK version, you can either uninstall all existing JDK versions, or install and configure jdk1.8.0_131 to make sure the java -version command returns 1.8.0_131. Then continue with step 2.
3. Run the cd /opt/netbraintemp command to navigate to the /opt/netbraintemp directory.
4.Copy the Elasticsearch.tar file into the /opt/netbraintemp directory.
Note: Don't place the installation package under any personal directories, such as /root.
▪Option 1: If the Linux server doesn't have access to the Internet:
Obtain the Elasticsearch.tar file in the installation package and upload it to the /opt/netbraintemp directory that you created by using a file transferring tool.
▪Option 2: If the Linux server has access to the Internet:
Run the cp Elasticsearch.tar /opt/netbraintemp command under the download directory in Section 2.1.1 to copy the Elasticsearch.tar file to the /opt/netbraintemp directory.
5.Extract installation files from the Elasticsearch.tar file by running the tar -xvf Elasticsearch.tar command under the /opt/netbraintemp directory.
[root@localhost netbraintemp]# tar -xvf Elasticsearch.tar
Elasticsearch/
Elasticsearch/preinstallcomponents/
Elasticsearch/preinstallcomponents/RedHat7/
Elasticsearch/preinstallcomponents/RedHat7/lsof-4.87-4.el7.x86_64.rpm
Elasticsearch/preinstallcomponents/CentOS7/
Elasticsearch/preinstallcomponents/CentOS7/lsof-4.87-4.el7.x86_64.rpm
Elasticsearch/elasticsearch-6.0.0.tar.gz
Elasticsearch/jdk-8u131-linux-x64.tar.gz
Elasticsearch/servicename
Elasticsearch/search-guard-6-6.0.0-17.beta1.zip
Elasticsearch/cert.pem
Elasticsearch/node.key
Elasticsearch/root-ca.pem
Elasticsearch/jdk.sh
Elasticsearch/elasticsearchconfig.sh
Elasticsearch/userpassword.sh
Elasticsearch/install_elasticsearch.conf
Elasticsearch/uninstallelasticsearch.sh
Elasticsearch/install.sh
Elasticsearch/installelasticsearch.sh
6.Run the cd Elasticsearch command to navigate to the Elasticsearch directory.
7.Modify the following parameters in the install_elasticsearch.conf file located under the Elasticsearch directory based on your needs and save the changes. See Appendix: Editing a File with VI Editor for more details.
#NetBrain elasticsearch config file
ESSystemUser elasticsearch
ESSystemGroup elasticsearch
InstallPath /opt/elasticsearch
ServiceName elasticsearch
ClusterName elastic-search-cluster
NodeName node1
#The Username or Password should not contain: {}[]:",'|<>@&^%\ or a space. The length cannot exceed 64 characters.
User admin
Password admin
DataPath /opt/elasticsearch/data
LogPath /opt/elasticsearch/logs
BindIp 10.10.3.142
Port 9200
#The maximum system resources that can be occupied by elasticsearch: CPUlimit(%), MemoryLimit(GB)
CPULimit 35%
MemoryLimit 4
UseSSL no
CertAndKeyPath /etc/ssl
PrivateKey node.key
Certificate cert.pem
CertAuth root-ca.pem
#single node or cluster
SingleNode yes
#Write all cluster members.
ClusterMembers 10.10.2.34 10.10.2.35 10.10.2.36
MasterOnlyNode no
Note: The ESSystemUser, ESSystemGroup, ServiceName, ClusterName, and NodeName arguments can only contain letters and numbers, and must start with a letter.
▪ESSystemUser — the system user created on the Linux server to run the service of the Index Server. Keep the default name as it is.
▪ESSystemGroup — the system group created on the Linux server to run the service of the Index Server. Keep the default name as it is.
▪InstallPath — the storage path for all binary and other installation files of the Index Server. Keep the default path as it is.
Note: Don't set the InstallPath argument under any personal directories, such as /root, or contain any special characters or spaces except slashes (/). The same rule applies to the DataPath, LogPath, and CertAndKeyPath arguments.
▪ServiceName — the service name of the Index Server. Keep the default name as it is.
▪ClusterName — a unique name of the cluster. Keep the default name as it is.
▪NodeName — a unique name of the node. Keep the default name as it is.
▪User — the admin username used to log in to the Index Server. By default, it is admin.
Note: The username and password cannot contain any of the following special characters, and its length cannot exceed 64 characters.
{ } [ ] : " , ' | < > @ & ^ % \ and spaces
▪Password — the admin password used to log in to the Index Server. By default, it is admin.
▪DataPath — the storage path for all data files of the Index Server.
Note: It is recommended to keep the default path as it is. If you want to modify it, don't use an existing directory and make sure the directory has more than 50GB free space to save all the data files.
▪LogPath — the storage path for all log files of the Index Server.
Note: It is recommended to keep the default path as it is. If you want to modify it, don't use an existing directory and make sure the directory has more than 10GB free space to save all the log files.
▪BindIp — the IP address of the Index Server.
Note: If you modify the argument to 0.0.0.0, you must use the fully qualified domain name (FQDN) to connect to the Index Server when installing the API Server and Worker Server.
▪Port — the port number that the service of the Index Server listens to. Keep the default value as it is.
▪CPULimit — the maximum CPU utilization that can be consumed by the Index Server. To make both MongoDB Server and Index Server utilize the CPU resources of the same machine, the recommended value is 35%. And the sum of CPU utilization allocated to the MongoDB Server and Index Server cannot exceed 90% of the machine's CPU.
▪MemoryLimit — the maximum memory capacity of the machine that can be consumed by the Index Server. To make both the MongoDB Server and Index Server utilize the memory resources of the same machine, the memory allocated to the Index Server must be in the range of 1/8 to1/4 of the physical memory of the machine. If the machine's memory is 16GB, the recommended value is 4GB; if the machine's memory is 32GB, you can modify the value to 8.
Note: The maximum memory that Index Server can utilize is 31GB. Setting the MemoryLimit value higher than 31 will not increase the performance of Index Server. Instead, it may affect the performance of co-existing servers on this machine.
▪UseSSL — whether to enable the encrypted connections to Index Server by using SSL. If yes, replace no with yes.
▪CertAndKeyPath (required only if UseSSL is enabled) — the storage path for all the certificates and key files used for SSL authentication.
▪PrivateKey (required only if UseSSL is enabled) — the name of SSL private key file.
▪Certificate (required only if UseSSL is enabled) — the name of SSL certificate file containing the public key.
▪CertAuth (required only if UseSSL is enabled) — the name of SSL certificate chain or intermediate certificate (class 2 or class 3 certificate).
▪SingleNode — control whether to enable the cluster deployment. By default, it is yes, which means cluster deployment is disabled.
▪ClusterMembers — required only for cluster deployments.
▪MasterOnlyNode — required only for cluster deployments.
8.Run the ./install.sh script under the Elasticsearch directory to install the Index Server and initialize the username as well as password.
Note: If OpenJDK is installed on your machine, the installation will pause. Enter 3 to install jdk1.8.0_131 to continue the installation.
Note: Don't modify or move the elasticsearch_installed.conf file generated under the /etc/netbrain/ directory. The file is required if you need to re-install the Index Server.
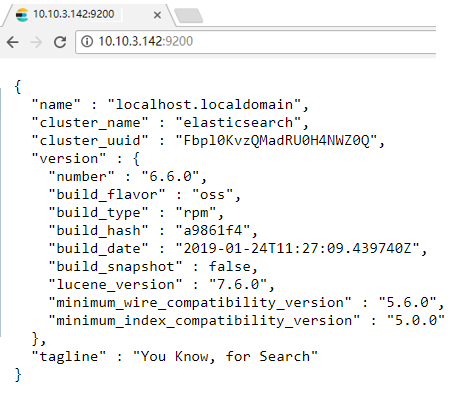
9.Complete the following steps to verify whether the service of the Index Server works normally.
1)Enter <IP address of Index Server>:<port number> in the address bar of your web browser. For example, 10.10.3.142:9200.
2)Enter the login username and password that you set up in the install_elasticsearch.conf file and click Login to authenticate your credentials. The default credentials are admin/admin.
3)If the login succeeds, you can browse the Index Server information on the login page. This is an example: