Install NIC in Dynamic Diagnosis

Contents
Dynamic Diagnosis installs NICs for triggered Dynamic Diagnosis with Function Tags and Hash Tags. When a ticket arrives, the NetBrain system will match the Incident Type with installed NIC using Function Tags and Hash Tags. Then the member NIs of the NIC are matched by the Hash Tag Values.
Follow the steps below to install the NIC for Dynamic Diagnosis:
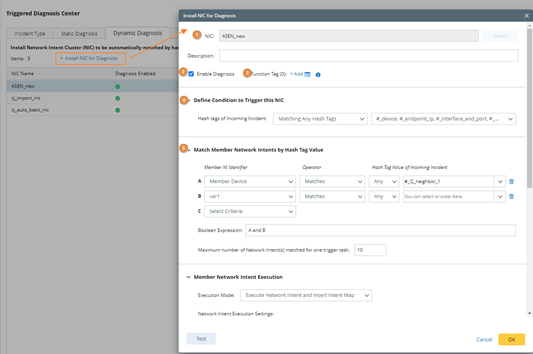
1. Select the NIC to be installed from the existing NICs.
2. Define whether to enable the NIC for Diagnosis. Only enabled NICs will be triggered for dynamic Diagnosis.
3. Define the Function Tags for this Installed NIC. The Functions Tags of the installed NIC will be matched with the Function Tags in Incident Type to filter out the suitable NICs statically.
4. Define the required Hash Tag rule to trigger this NIC. For example, ‘Matching Any Hash Tags #bgp_device’ means any Incident Type that has Hash Tag #bgp_device will match this NIC.
5. Filter the Member NIs with Hash Tag Value. The Member NIs of the installed NIC will be further filtered by the Hash Tag Value of the incoming Incident, and only matching Member NIs will be executed. For example, ‘Member Device Match Any #_l2_neighbor_1’ means Member Device must match the Hash Tag Value of Hash Tag #_l2_neighbor_1. Only the Member NI that matches the specified criteria will be triggered.
6. Define the execution mode of member NIs. This step is same as the static diagnosis.
7. Define the guide of the interactive automation. This step is same as the static diagnosis.
8. Subscribe the alerts from the Preventive Automation. This step is same as the static diagnosis.