Configuring AD Authentication

Contents
Note: Make sure the sAMAccountname attribute is properly configured on the AD server for the target group members. The attribute will be used as login username of the system.
1.Log in to the System Management page.
2.In the System Management page, click User Accounts > External Authentication.
3.Click the ![]() icon and select Add AD Authentication from the drop-down list. A wizard is opened to guide you through the steps to connect to the AD server and configure the tenant or domain access privileges for the imported user accounts.
icon and select Add AD Authentication from the drop-down list. A wizard is opened to guide you through the steps to connect to the AD server and configure the tenant or domain access privileges for the imported user accounts.

1)Enter a unique name to identify the AD server and a brief description.
2)Enter the credentials to connect to the AD server. See AD Server Settings for more details.
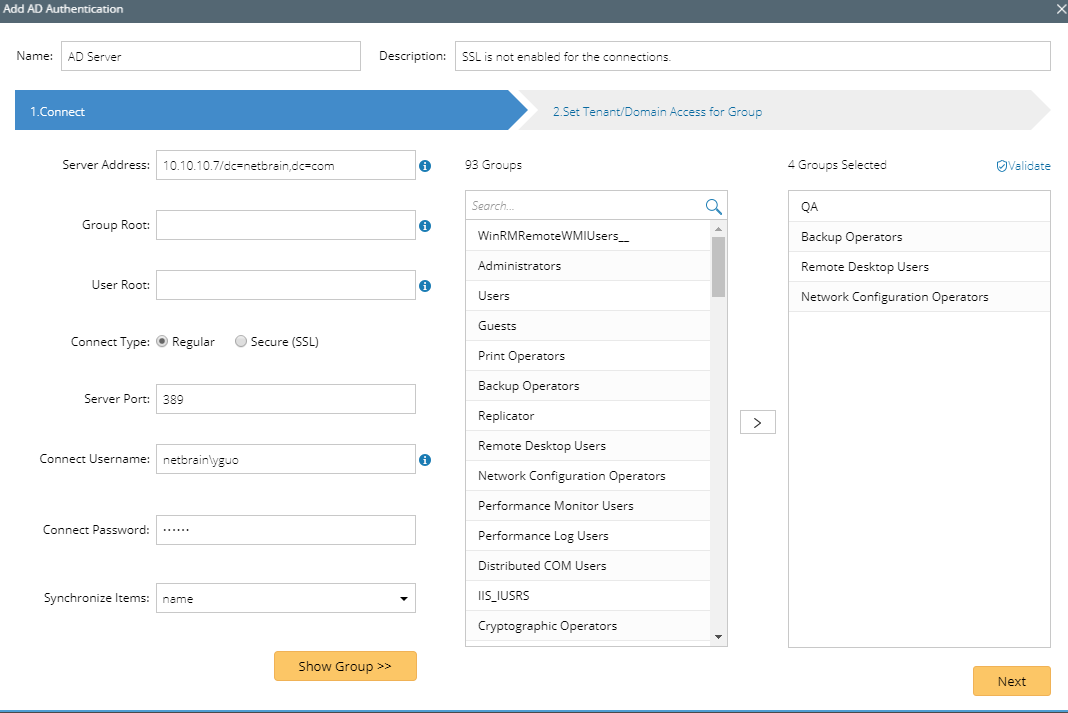
3)Click Show Group to find available user groups from the AD server. All matched groups are listed in the Groups pane.
4)Select one or more user groups to import, and then click Next.
Note: The user accounts in a primary group of the AD server can be synchronized into the system but cannot log in.
Tip: Click Validate to verify whether the selected groups still exist on the AD server. Click the  icon to remove an invalid group from the list.
5)Assign domain access and more privileges to the user accounts in the selected groups.

▪System Admin — click to assign the system administrator role to the user accounts. For the detailed privileges of System Management and User Management, refer to Featured Management Privileges.
▪Tenant Access — select one or more tenants to assign access permissions to the user accounts.
▪Tenant Admin — select one or more tenants to assign the tenant administrator role to the user accounts.
▪Allowed to Create Domain — select the check box to assign the domain creation permission to the user accounts.
▪Domain Access — select one or more domains to assign access permissions to the user accounts.
▪Domain Privileges — click Assign Privileges to assign more domain privileges to the user accounts by role. See Share Policy for more details.
6)Click Save to commit the settings.
7)In the pop-up dialog, enter the username and password of a user account under the specified server address or user root and click Verify to authenticate the connection.
8)Click OK.
4.Navigate to the Users tab and click Synchronize With LDAP/AD Server to immediately load the user accounts imported from the AD server. Alternately, the user accounts can also be automatically synchronized after the first-time login.
Note: The synchronization will only carry out on the enabled authentications. If you add a new user account to the selected group on the AD server after the synchronization, the user can immediately log in to the specified domains with the assigned roles and privileges. If you delete any user accounts from the AD server, the changes will not be synchronized with the system automatically. You have to manually remove them from the system.
Note: To prevent the assigned roles and privileges of an external user account from being synced with any changed authentication settings, you can lock the user rights as follows. See Creating User Account for more details.

Using SSL on AD Server
If you configured SSL on the AD server, complete the following configurations to connect to NetBrain Web API Server by using the Secure(SSL) connect type.
1.On NetBrain Web API Server, do the following:
Note: You can skip the following step 1) and step 2) by adding NetBrain Web API Server into the domain of the AD server.
1)Import the CA certificate used on the AD server into the Trusted Root Certification Authority directory as follows:

2)Configure the IP address of the AD server as the preferred DNS server through Network Settings, and then restart network service.

3)Add the mapping relationship between the IP address and hostname of the AD server into the hosts file, which is located under the C:\Windows\System32\drivers\etc\ directory.
2.When configuring the connection information on the External Authentication tab, enter the FQDN of the AD server in the Server Address field.