Installing Cache Server

Contents
NetworkBrain Cache Server adopts Redis to provide memory cache for the system. Depending on your network scale, you can deploy either a standalone Cache Server, or a cluster with separate Master/Slave/Sentinel for high availability.
A Cache Server Cluster contains the following three components:
▪Redis Master — the primary node of a Redis replication.
▪Redis Slave — the secondary node of a Redis replication, and will be promoted as the Master during a failover by the Sentinel.
▪Redis Sentinel — the crucial part of a reliable Redis failover plan, which monitors both Master and Slave, and attempts a failover when the Redis Master service is unavailable.
Complete the following steps with administrative privileges.
1.Obtain the installation package from NetBrain and save it in your local folder.
2.Right-click the Redis.exe file, and then select Run as administrator to start the Installation Wizard.
1)On the Welcome page, click Next.
2)On the System Configuration page, review the system configuration summary and click Next.
3)On the Customer Information page, enter your username and company name, and then click Next.
4)On the Destination Location page, click Next to install the Cache Server under the default directory C:\Program Files\NetworkBrain\. If you want to install it under another location, click Change.
5)Select the Redis Master component, and then click Next.

6)Configure the following information for the Master Cache Server, and then click Next.
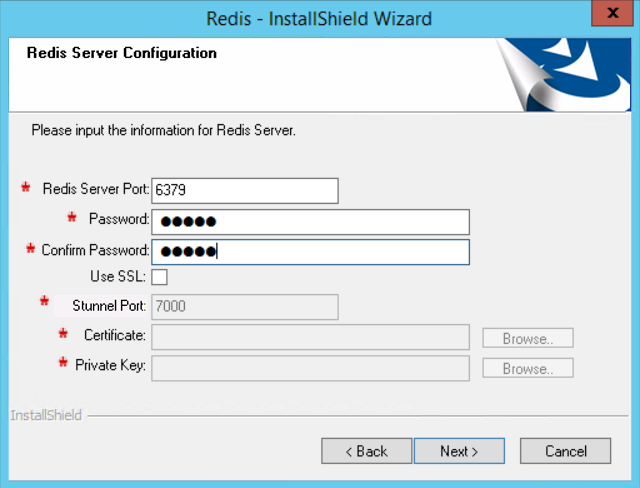
▪Redis Server Port — configure a port number for the Master Cache Server to communicate with Web API Server, Worker Server, and Front Server Controller. By default, it is 6379.
▪Password — create an admin password to log in or connect to the Master Cache Server.
Note: The password cannot contain any of the following special characters. And its length cannot exceed 64 characters.
{ } [ ] : " , ' | < > @ & ^ % \ and spaces
Tip: The configured port number and password are written to the redis.windows-service.conf file saved under the C:\Program Files\NetworkBrain\Redis directory.
▪Confirm Password — retype the password.
▪Use SSL — used to encrypt the connections to the Master Cache Server with SSL.
Note: Cache Server itself does not support SSL. To use SSL on Cache Server, you must install stunnel as SSL service agent beforehand.
oStunnel Port — required only if Use SSL is enabled. Configure a port number for stunnel to establish an SSL encrypted tunnel on this Cache Server. By default, it is 7000.
Tip: The configured Stunnel port number is written to the stunnel.conf file saved under the C:\Program Files (x86)\stunnel\config directory.
oCertificate — required only if Use SSL is enabled. Click Browse to select the certificate file containing the public key.
oPrivate Key — required only if Use SSL is enabled. Click Browse to select the private key file.
7)Review the summary of the installation settings and click Install.
3.Click Finish to complete the installation process and exit the Installation Wizard. After successfully installing the Cache Server, you can open the Task Manager to check that the RedisMaster service is running.
Tip: The installation log file is saved under the C:\ drive. If you encounter any issues during the installation, check the log file for more details.
4.Repeat step1 to step 2.5) to install Redis Slave/Sentinel.
Note: Redis Slave and Sentinel nodes must be deployed separately on different machines.
Note: Redis Server Cluster requires TCP 16379 port for internal node-to-node data exchange. Redis Sentinel node requires TCP 26379 port to listen for its connections.
5.Select the component Redis Slave or Redis Sentinel, and then click Next.
6.Based on the component you selected, configure the following information, and then click Next.
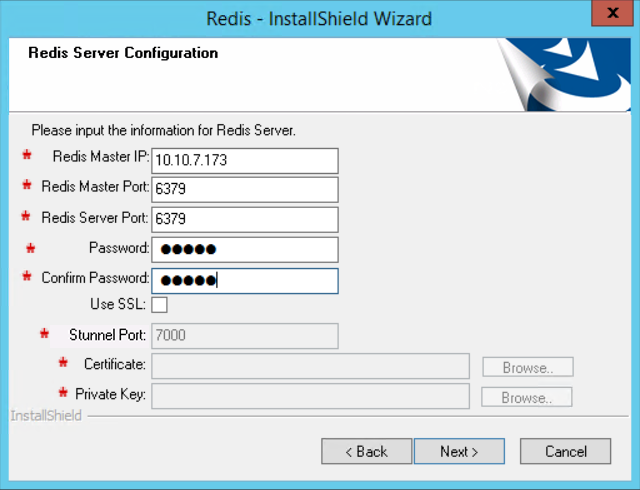
▪Redis Master IP — the IP address of the Master Cache Server.
Note: Don't use the FQDN to connect to the Master Cache Server.
▪Redis Master Port — the port number configured when installing Master Cache Server to communicate with Web API Server and Worker Server. By default, it is 6379.
▪Redis Server Port — configure a port number for the Slave or the Sentinel to communicate with Web API Server and Worker Server. By default, it is 6379.
▪Password — create an authentication password to log in or connect to the Slave or the Sentinel node.
Note: Both the Slave and Sentinel nodes must have the same password with Master node.
▪Confirm Password — retype the password.
▪Use SSL — used to encrypt the connections to the Slave or Sentinel node with SSL. If SSL is enabled on Master node, select it; otherwise, leave is unchecked.
Note: Cache Server itself does not support SSL. To use SSL on Cache Server, you must install stunnel as SSL service agent beforehand.
oStunnel Port — required only if SSL is enabled. Configure a port number for stunnel to establish an SSL encrypted tunnel on this Cache Server. By default, it is 7000.
Note: Both the Slave and Sentinel nodes must have the same stunnel port number with Master node.
oCertificate — required only if SSL is enabled. Click Browse to select the certificate file containing the public key.
oPrivate Key — required only if SSL is enabled. Click Browse to select the private key file.
7.Review the summary of the installation information and click Install.
8.Click Finish to complete the installation process and exit the Installation Wizard.
9.Verify the Cache Server Cluster.
1)On the Sentinel Server, navigate to its installation path. By default, the installation path is C:\Program Files\NetworkBrain\Redis.
2)Press and hold the Shift key on your keyboard, and then select Open command window here from the right-click menu to open the command line interface.
3)Enter the redis-cli -h <sentinel_ip_address> -p <port_number> command and press the Enter key. For example, redis-cli -h 10.10.7.175 -p 6379.
C:\Program Files\NetworkBrain\Redis>redis-cli -h 10.10.7.175 -p 6379
10.10.7.175:6379>
4)Enter the sentinel masters command and press the Enter key to monitor the information of Master Cache Server.
10.10.7.175:6379> sentinel masters
1) 1) "name"
2) "nbreplica"
3) "ip"
4) "10.10.7.173"
5) "port"
6) "6379"
7) "runid"
8) "3ae353b666495dc953f3be5d462e6bd9347b735b"
9) "flags"
10) "master"
11) "pending-commands"
12) "0"
13) "last-ping-sent"
14) "0"
15) "last-ok-ping-reply"
16) "1035"|
17) "last-ping-reply"
18) "1035"
19) "down-after-milliseconds"
20) "5000"
21) "info-refresh"
22) "6863"
23) "role-reported"
24) "master"
25) "role-reported-time"
26) "5621981485"
27) "config-epoch"
28) "0"
29) "num-slaves"
30) "1"
31) "num-other-sentinels"
32) "0"
33) "quorum"
34) "1"
35) "failover-timeout"
36) "5000"
37) "parallel-syncs"
38) "1"
10.10.7.175:6379>
5)Enter the sentinel slaves nbreplica command to monitor the information of Slave Cache Server.
10.10.7.175:6379> sentinel slaves nbreplica
1) 1) "name"
2) "10.10.7.174:6379"
3) "ip"
4) "10.10.7.174"
5) "port"
6) "6379"
7) "runid"
8) "fd538ebcb255e0152d29fa74bf46c1032b068134"
9) "flags"
10) "slave"
11) "pending-commands"
12) "0"
13) "last-ping-sent"
14) "0"
15) "last-ok-ping-reply"
16) "389"
17) "last-ping-reply"
18) "389"
19) "down-after-milliseconds"
20) "5000"
21) "info-refresh"
22) "2373"
23) "role-reported"
24) "slave"
25) "role-reported-time"
26) "5622546774"
27) "master-link-down-time"
28) "0"
29) "master-link-status"
30) "ok"
31) "master-host"
32) "10.10.5.76"
33) "master-port"
34) "6333"
35) "slave-priority"
36) "100"
37) "slave-repl-offset"
38) "7350040"
10.10.7.175:6379>