Installing NetBrain Application Server on Windows

Contents
Before the installation, make sure that the machine meets the System Requirements and Deployment Prerequisites.All NetBrain Windows components, including Web Server, Web API Server, Worker Server, Task Engine, Front Server Controller, Front Server, and Service Monitor Agent will be installed sequentially on this Windows server.
Pre-installation Tasks
▪Make sure the extended memory of your machine is larger than 16GB and the Windows update is of the latest.
▪Make sure the language of the operating system is English.
▪Remove the Existing Internet Information Services (IIS) and disable the FIPS setting by modifying the Enabled value to 0 under the HKEY_LOCAL_MACHINE\SYSTEM\CurrentControlSet\Control\Lsa\FipsAlgorithmPolicy directory of Windows registry.

▪If you use a proxy server to access the Internet on this server, you must add the IP address of Elasticsearch into the proxy exception list so that the Application Server can communicate with the Elasticsearch.
1)Click the ![]() icon at the upper-right corner of Chrome and select Settings > Advanced.
icon at the upper-right corner of Chrome and select Settings > Advanced.
2)In the System area, click Open proxy settings.
3)On the Connections tab, click LAN settings.
4)In the Proxy Server area, click Advanced to add the IP address and port number of Elasticsearch into the Exceptions area.
▪If you are using a virtual machine, make sure the time of the virtual machine is synchronous with the Internet time server.
Installing Application Server
Complete the following steps with administrative privileges.
1.Download the netbrain-all-in-two-windows-x86_64-10.0.zip file and save it in your local folder.
Tip: Contact NetBrain Support Team to get the download link.
2.Extract files from the netbrain-all-in-two-windows-x86_64-10.0.zip file.
3.Navigate to the netbrain-all-in-two-windows-x86_64-10.0 folder, right-click the netbrain-application-10.0.exe file and then select Run as administrator to launch the Installation Wizard.
4.Follow the Installation Wizard to complete the installation step by step:
1).NET Framework 4.8 must be pre-installed on this machine before you install the Application Server. The Installation Wizard will automatically check this dependency. If it has not been installed, the wizard will guide you through the installation as follows; if it has been installed, the wizard will directly go to step 2).
a)Click Install.

b)Read the license agreement of Microsoft .NET Framework 4.8, select the I agree to the license terms and conditions check box and click Install. It might take a few minutes for the installation to be completed.
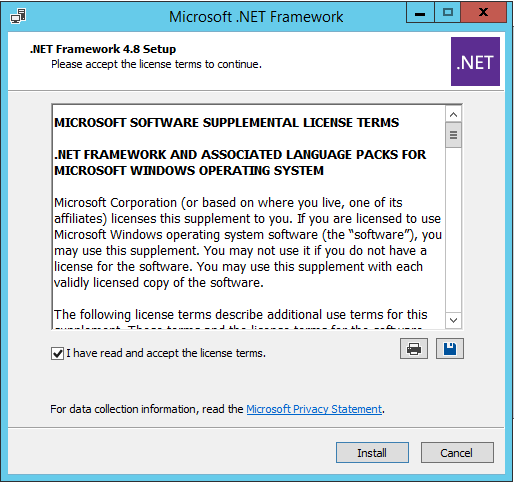
Note: Some running applications must be closed during the installation of .NET Framework 4.8, such as Server Manager.
c)You must click Restart to restart the machine immediately. Otherwise, the upgrade will fail due to the failure of upgrading the new .Net Framework. After the machine reboots, continue with step 2).

Note: Ensure the FIPS is disabled after restarting the machine. To disable the FIPS setting, modify the Enabled value to 0 under the HKEY_LOCAL_MACHINE\SYSTEM\CurrentControlSet\Control\Lsa\FipsAlgorithmPolicy directory of Windows registry.
Note: The interface above may not appear if the .NET Framework has never been installed on the server. In such case, it is still highly recommended to reboot the server after the installation of the .NET Framework completes.
2)On the Welcome page, click Next.
3)On the NetBrain Integrated Edition Prerequisites page, read the list of Linux components that must be deployed beforehand in your environment and click Next.

4)On the System Configuration page, review the system configuration summary and click Next.
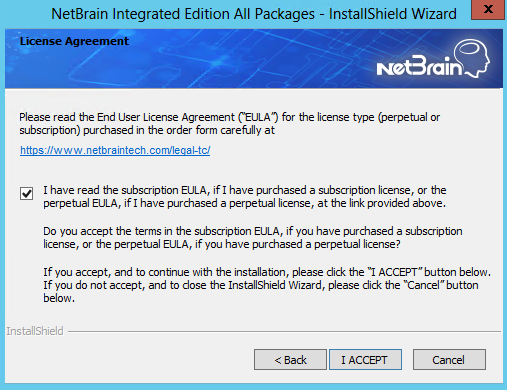
5)On the License Agreement page, read the license agreement, and then select the I have read the subscription EULA check box and click I ACCEPT.
6)On the Customer Information page, enter your company name and click Next.
7)Click Next to install the Application Server under the default path: C:\Program Files\NetBrain\. If you want to install it under another location, click Change.
Note: If you select to install it under another drive, make sure there are no spaces in the installation path. For example, use D:\Program_Files\ instead of D:\Program Files\.
Note: Make sure the designated data folder has more than 100GB free space.
8)On the System Connectivity Configuration page, enter the information to connect to NetBrain Database Server, including the IP of NetBrain Database Server and the service username and password created on NetBrain Database Server. Click Next.

Note: If you enabled SSL on NetBrain Database Server, you must select the Use SSL check box here. Both NetBrain Database Server and NetBrain Application Server must use the same set of SSL certificate files.
Note: Select the Use Customized Ports check box only if you customized a port number for any of Linux components during the installation of NetBrain Database Server.
9)(Required only if the Use Customized Ports check box is selected) On the Customized Settings page, you can customize the ports of Linux Components and customize the port for Front Server Controller if you don't want to use the default port 9095. Click Next.
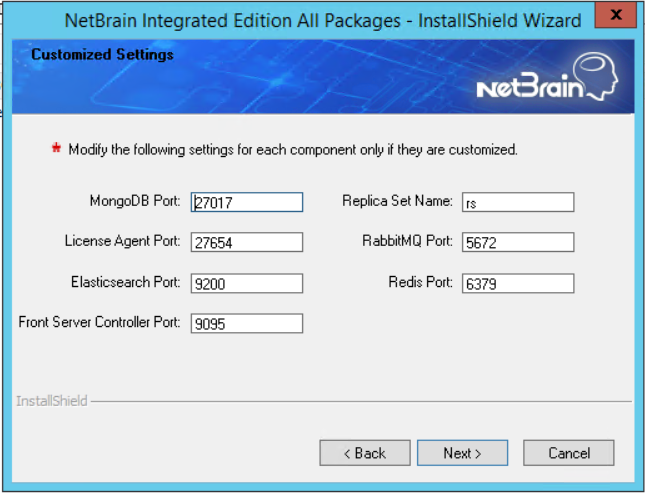
NetBrain Application Server will use the specified information of NetBrain Database Server, including IP address, username, password, SSL Settings, and port settings to validate the connectivity to MongoDB, License Agent, Elasticsearch, RabbitMQ, and Redis one by one.
10) On the Auto Update Server, enter the information for Auto Update Server and click Next.
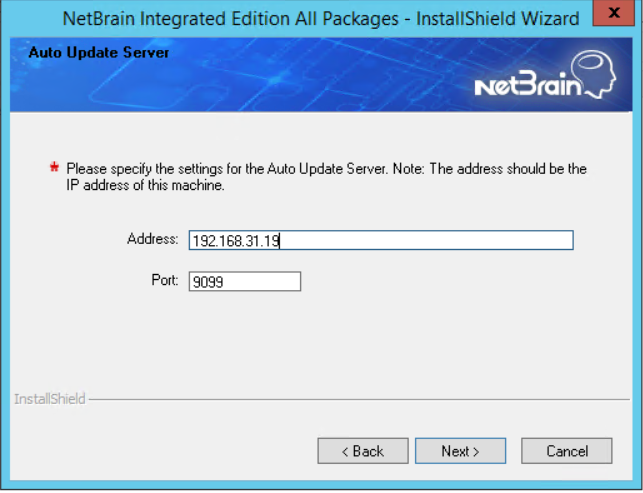
Note: The Address must be the local server’s IP address which can be reached from other NetBrain servers including Front Server.
11) (Required only if the Use SSL check box is selected) Configure the following SSL settings.
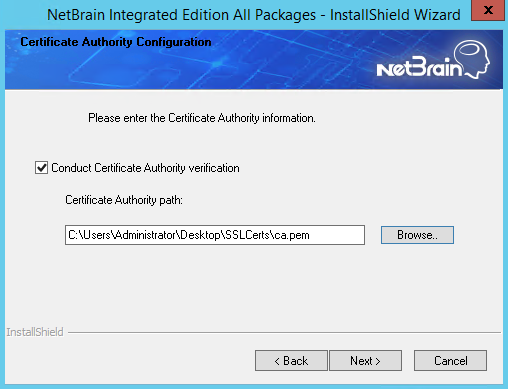
a)On the Certificate Authority Configuration page, to validate the Certificate Authority (CA) of the SSL certificates used on NetBrain Database Server, select the Conduct Certificate Authority verification check box (optional) and click Browse to upload the chain certificate file. Click Next.
b)On the Certificate Configuration page, click Browse to upload the certificate file and private key file to enable SSL communications on Front Server Controller and Auto Update Server. Click Next.

12) On the KeyVault Administration Passphrase Settings page, create a passphrase to initialize and manage the system KeyVault which contains all encryption keys to protect data security. Type it twice and click Next.

Tip: The passphrase must contain at least one uppercase letter, one lowercase letter, one number, and one special character, and the minimum permissible length is 8 characters. All special characters except for the quotation mark (") are allowed.
Note: Keep notes of the passphrase because it is required when you scale up or upgrade the Application Server. In case of losing the passphrase, select the Enable Resetting KVAP check box so that NetBrain system administrator can reset the passphrase at any time.
13) On the NetBrain Front Server page, create a password for the PostgreSQL data. Type it twice and click Next.

Note: If you want to save the PostgreSQL data under another location, click Change.
Note: Make sure the designated data folder has more than 180GB free space.
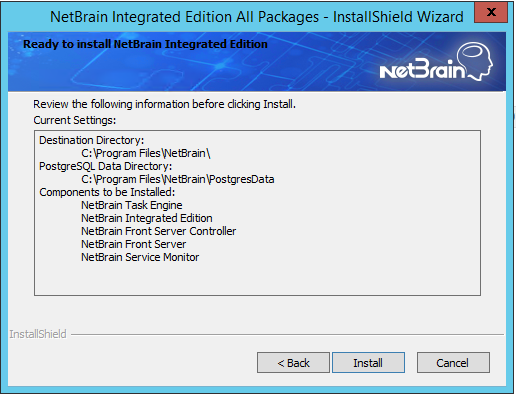
14) Review the server components to be installed and click Install. All the Windows components will be installed one by one. It will take a long while for all the components to be installed.
Note: Depending on the hard drive type of the Application Server, the entire installation process may take approximately 1hour (SSD) to 2.5 hours (HDD). Please expect the lengthy installation process and refrain from interrupting it.
15) (Optional) Ensure the NetBrain installation process using administrator account has the necessary permissions to modify “User Rights Assignment” in “Local Security Policy” or change the local user privileges. Otherwise, the following error message will prompt when installing each Windows component.
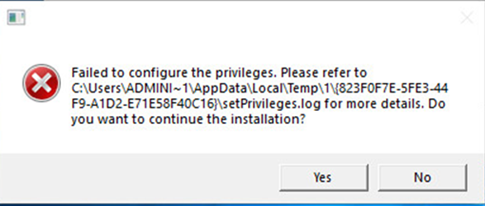
Click Yes to continue with installation/upgrade process and NetBrain service will be configured to run as Local System. If you have security concerns, please click No to abort the installation/upgrade.
Note: Local System accounts have additional privileges that are considered a high risk. Please verify that this is an acceptable risk in accordance with your SysAdmin policies.
Note: After clicking No, please check with your system administration team to enable the relevant permissions, uninstall the affected component(s) and reinstall. Contact NetBrain support team if you need any assistance during the process.
5.After all the components are successfully installed, click Finish to complete the installation process and exit the Installation Wizard.
6.Open the Task Manager and navigate to the Services panel, you can find the following running NetBrain services.
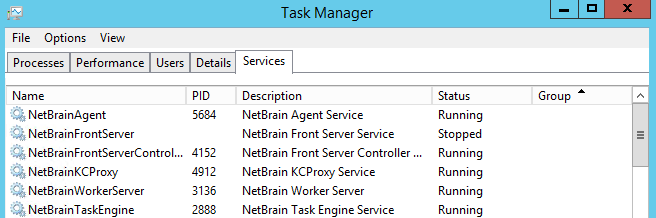
Tip: The NetBrainFrontServer service is not running because Front Server has not been registered.
See also: