Installing Front Server Controller on Windows

Contents
Note: Service Monitor Agent needs to be installed prior to installing Front Server Controller. Refer to Installing Service Monitor Agent on Windows for more detailed steps.
Complete the following steps with administrative privileges.
1.Download the netbrain-frontservercontroller-windows-x86_64-10.0.zip file and save it in your local folder.
Tip: Contact NetBrain Support Team to get the download link.
2.Extract installation files from the netbrain-frontservercontroller-windows-x86_64-10.0.zip file.
3.Right-click the netbrain-frontservercontroller-windows-x86_64-10.0.exe file, and then select Run as administrator to start the Installation Wizard.
1)On the Welcome page, click Next.
2)On the System Configuration page, review the system configuration summary and click Next.
3)On the License Agreement page, read the license agreements, select the I have read the subscription EULA… check box and then click I ACCEPT.

4)On the Customer Information page, enter your company name, and then click Next.
5)On the Destination Location page, click Next to install the Front Server Controller under the default directory C:\Program Files\NetBrain\. If you want to install it under another location, click Change.
6)On the Local Configuration page, configure the following information, and then click Next.

▪Front Server Controller Name — create a name for the controller to authenticate the connections established from Worker Server and Front Server.
Note: This field cannot contain any of the special characters: \ / : * ? ” < > | . $
Note: Keep notes of Front Server Controller Name as well as Port, Username, and Password because they are required when you allocate tenants to Front Server Controller and register a Front Server.
▪Port — specify the port number used for the connections from Worker Server and Front Server. By default, it is 9095.
▪Username — create a username to authenticate the connections established from Worker Server and Front Server.
▪Password — create a password to authenticate the connections established from Worker Server and Front Server.
7)On the Local SSL Configuration page, configure whether to enable SSL on Front Server Controller, and then click Next.
▪Enable SSL — used to encrypt the connections established from Worker Server and Front Server with SSL.
oCertificate — required only if Enable SSL is selected. Click Browse to select the certificate file containing the public key. For example, cert.pem.
oPrivate Key — required only if Enable SSL is selected. Click Browse to select the private key file. For example, key.pem.
8)On the MongoDB Configuration page, enter the following information to connect to MongoDB and then click Next.
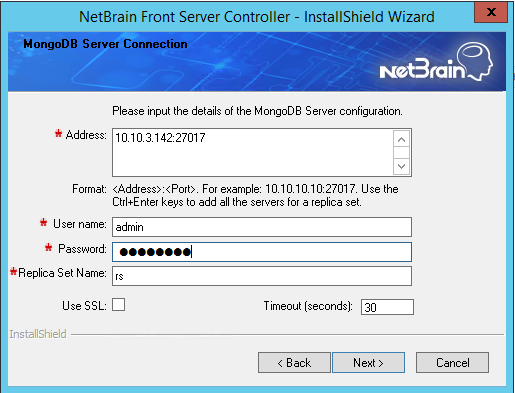
▪Address — enter the IP address or resolvable FQDN of MongoDB and the corresponding port number. By default, the port number is 27017.
Tip: You can enter the fully qualified domain name (FQDN) of MongoDB if all NetBrain servers are managed in the same domain. For example, test.netbraintech.com:27017.
▪User Name — enter the username that you created when installing MongoDB.
▪Password — enter the password that you created when installing MongoDB.
▪Replica Set Name — enter the replica set name of MongoDB. Keep the default value rs as it is unless you changed it.
▪Use SSL — used to encrypt the connections to MongoDB with SSL. If SSL is enabled on MongoDB, select this check box; otherwise, leave it unchecked.
▪Validation Timeout (seconds) — it is used to set the connection timeout threshold (in second) to validate the connection to the dependent server. This will not affect the application running timeout value.
9)On the RabbitMQ Connection page, enter the following information to connect RabbitMQ, and then click Next.

▪Address — enter the IP address or resolvable FQDN of RabbitMQ.
Tip: You can enter the FQDN of RabbitMQ if all NetBrain servers are managed in the same domain.
▪User Name — enter the admin username that you created when installing RabbitMQ.
▪Password — enter the admin password corresponding to the username that you created when installing RabbitMQ.
▪Port Number — enter the port number used by RabbitMQ to communicate with Web API Server, Worker Server, and Task Engine. By default, it is 5672.
▪Use SSL — used to encrypt the connections to RabbitMQ with SSL. If SSL is enabled on RabbitMQ, select it; otherwise, leave it unchecked.
▪Validation Timeout (seconds) — it is used to set the connection timeout threshold (in second) to validate the connection to the dependent server. This will not affect the application running timeout value.
10) On the Redis Connection page, enter the following information to connect to Redis by selecting the Standalone mode, and then click Next.
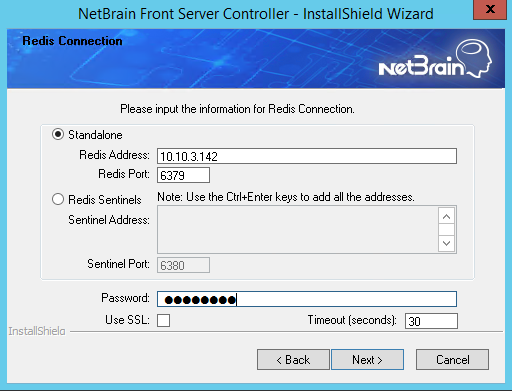
▪Redis Address — enter the IP address of Redis.
Tip: You can enter the FQDN of Redis if all NetBrain servers are managed in the same domain.
▪Password — enter the admin password that you created when installing Redis.
▪Use SSL — used to encrypt the connections to Redis with SSL. If SSL is enabled on Redis, select it; otherwise, leave it unchecked.
▪Redis Port — enter the port number used by Redis to communicate with Web API Server, Worker Server, and Front Server Controller. By default, it is 6379.
▪Validation Timeout (seconds) — it is used to set the connection timeout threshold (in second) to validate the connection to the dependent server. This will not affect the application running timeout value.
11) (Required only if the Use SSL check box is selected when configuring the connections to MongoDB, RabbitMQ, or Redis). Configure whether to authenticate the CA of SSL certificates on these servers, and then click Next.

To authenticate CA:
a)Select the Conduct Certificate Authority verification check box.
b)If the CA has not been installed on this machine, click Browse to import the CA certificate file, for example, ca.pem.
Note: Only the certificate in Base-64 encoded X.509 PEM format is supported.
Note: The following conditions must be met for the CA certificate file:
- The CA certificate must contain CRL Distribution Points property with valid CRL HTTP distribution point URL. (CRL stands for Certificate Revocation List.)
- The CRL Distribution Points URL must be accessible to Web Server/Worker Server.
- Internet access must be ensured if the certificate is signed by third-party CA.
12) On the KeyVault Administration Passphrase Settings page, enter the passphrase that you created when installing Web API Server twice and select the Enable Resetting KVAP check box to enable the KVAP resetting. Click Next.

13)Review the summary of the installation information and click Install.
14) (Optional) Ensure the NetBrain installation process using administrator account has the necessary permissions to modify “User Rights Assignment” in “Local Security Policy” or change the local user privileges. Otherwise, the following error message will prompt when installing each Windows component.
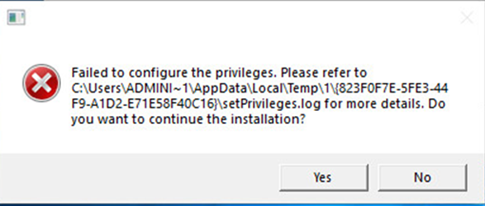
Click Yes to continue with installation/upgrade process and NetBrain service will be configured to run as Local System. If you have security concerns, please click No to abort the installation/upgrade.
Note: Local System accounts have additional privileges that are considered a high risk. Please verify that this is an acceptable risk in accordance with your SysAdmin policies.
Note: After clicking No, please check with your system administration team to enable the relevant permissions, uninstall the affected component(s) and reinstall. Contact NetBrain support team if you need any assistance during the process.
4.After successfully installing the Front Server Controller, click Finish to complete the installation process and exit the Installation Wizard.
5.Open the Task Manager and navigate to the Services panel to check that the NetBrainFrontServerController service is running.
6.To install one more Front Server Controller for failover, repeat the above steps, and then go to the System Management page to group the two Front Server Controllers as active/standby nodes.
Tip: The installation log file is saved under the C:\NBIEInstall and named as nbfscinstall. If you encounter any issues during the installation, check the log file for more details.