2023-Nov-03-R11.1a
Setup Triggered Diagnosis by Email
Follow the steps below to setup Triggered Diagnosis by Email:
-
Define the Incoming Email Server Setting
In the Email Settings tab in System Management, you can set up the receiver Email address for the NetBrain IE system:
- Enable or disable the IE system to receive Emails.
-
Define the authentication method:
- Select Basic Authentication> Define the IMAP Server for the NetBrain Receiver Email address, including the port and type of encryption.
- Select OAuth 2.0 for Microsoft Office 365, then follow the steps in Oauth2.0 Configuration Guide.
-
Define the Receiver's Email address, the password, and the frequency of collecting Emails.

-
Configure who can run Triggered Diagnosis via Email.
In the Email Trigger Configuration tab, you can add an Email Address or Email Suffix to define the allowed Email address for NetBrain. Three components need to be defined for each Email address:
- The Email address or Email suffix.
- Key for this Email. Each Email address or Email suffix will have a unique key used for authentication. In the Email subject, the key for the sender's Email address or Email suffix must be filled in correctly to pass the security check.
-
Accessible Tenant and Domain. Each Email address can only trigger the Diagnosis in the Tenants and Domains specified by the Accessible Tenant and Domain.

-
Define Outgoing Email Server Settings
In the Outgoing Email Server Settings tab, you can define the outgoing Email server settings such as Email address, password, and SMTP port.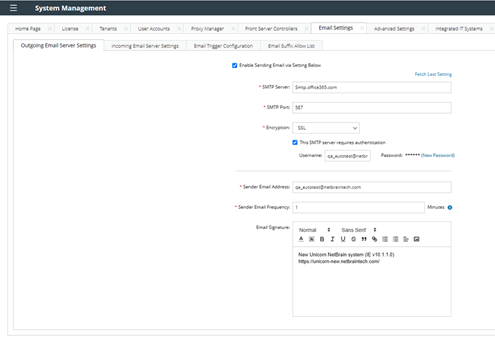
-
Enable email trigger for the incident type and data field.
-
Click
 and select Triggered Automation Manager.
- Navigate to the Incoming Incident Type tab or the Virtual Incident Type tab, and select the desired incident type.
- Click
 and select Define Interactive Trigger.
 - Enable the Email Trigger for the incident type and the data field.


Note: If the data field was defined as a mandatory data field in the incident type, the checkbox here will be checked and cannot be unchecked.
-
Click
- Define the email template.
- Click the Email Trigger tab, and you can preview the email template on the left pane.

- Click the subject and define the key description and subject content. Then click Apply.

- Click each block of the email body and define the descriptions. Click Apply when one block is finished.
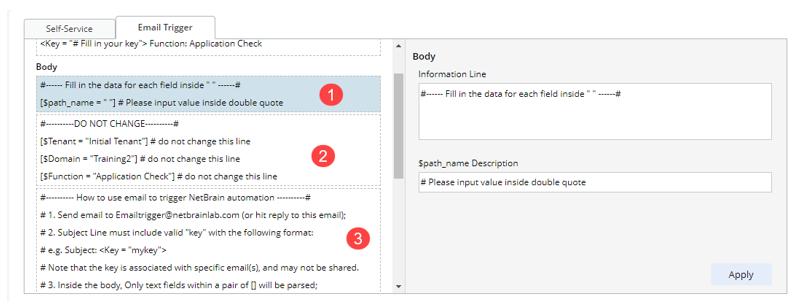
- Click the Email Trigger tab, and you can preview the email template on the left pane.
- You can export the Email template or send it to end-users.

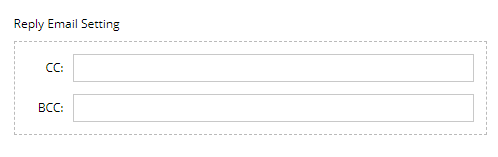
- Define the Reply Email Setting. When the triggered diagnosis is complete, the system will send the diagnosis to these emails.
- Click Save.