10.1.15.12-06212024
Define Self-Service
Self-serviceAutomation: Self-service automation resides inside the incident-based collaboration system, including Incident Portal, ServiceNow App 3.0, and Incident Pane. It serves two purposes:
- For a non-structured ticket that may be created manually, the automated trigger rule didn’t get fired, and users can manually launch diagnosis, which has a similar effect to the automated Trigger.
- For Sr. network engineers to share automated diagnosis function to junior network engineers, or non-network engineers, while resolving an IT problem, without login to NetBrain system.
If the incident type is enabled for Self-service, the installed NI, NIC, NIT and ADT Intent can be manually triggered by self-services, so you can trigger the incident type from the incident pane or incident portal.

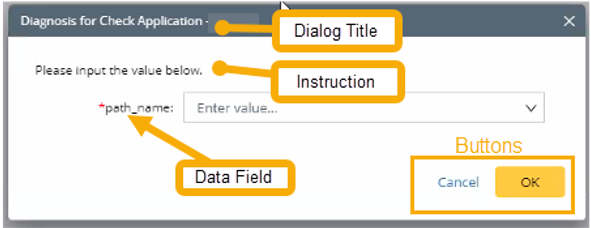
Self-service Settings defines parameters an end-user must input in the pop-up window when the Diagnosis is selected and run.
Follow the steps to define self-service:
-
Click
 and select Triggered Automation Manager.
- In Triggered Automation Manager, navigate to the Incoming Incident Type or Virtual Incident Type tab.
-
Select the incident type, click
 and select Define Interactive Trigger.
- In the Define Interactive Trigger for Incident Type window, enable the Self-Service checkbox.
-
Enable the Enabled Field for self -Service checkbox for the desired data field.

Note: If the data field was defined as a mandatory data field in the incident type, the checkbox here will be checked and cannot be unchecked. 
-
In the Self-Service tab, define the following items:
-
Click the Dialog title on the left pane and define it on the right pane, for example, Diagnosis for Check Application. Click Apply.

-
Click the instruction on the left pane and define it on the right pane. For example: Please input the value below. Click Apply.

-
Click the data field on the left pane and define it on the right pane.

- Prompt for Input: the label for the input field. The default value is the name of the data field.
- Hint: The hint in the input box. The default value is Enter Value…
- Input Type: You can define whether the end-user can select one or more than one item from the candidate values.
-
Mandatory: Whether it is mandatory a mandatory data field. If mandatory, the end-user will see a * before the label for the input field.
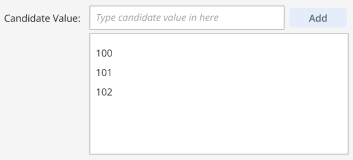
Note: If the data field was defined as a mandatory data field in the incident type, the mandatory here will be checked and cannot be unchecked. - Candidate Value:
-
If This Field is Device Name is disabled:
-
Click the Dialog title on the left pane and define it on the right pane, for example, Diagnosis for Check Application. Click Apply.
- Enter the value and click Add.
- Repeat step 1 if more candidate values are required.
- Click Apply.
-
If This Field is Device Name is enabled:

-
If you select From Context:
- Device in map and Incident: The devices in the current map and current Incident will be used as the candidate values.
- Device in map: The devices in the current map will be used as the candidate values.
-
Device in Incident: The devices in the current Incident will be used as the candidate values.
Click Apply.
- If you select Pre-Defined Devices: Manually select the devices as the candidate values.
-
If you select From Context:
- Click Select Device.
-
In the Select Device window, select the device on the left pane, then click
 .
.
- Click OK when you finish the selection.
- Click Apply.
d. Click the buttons on the left pane and define them on the right pane. Click Apply.
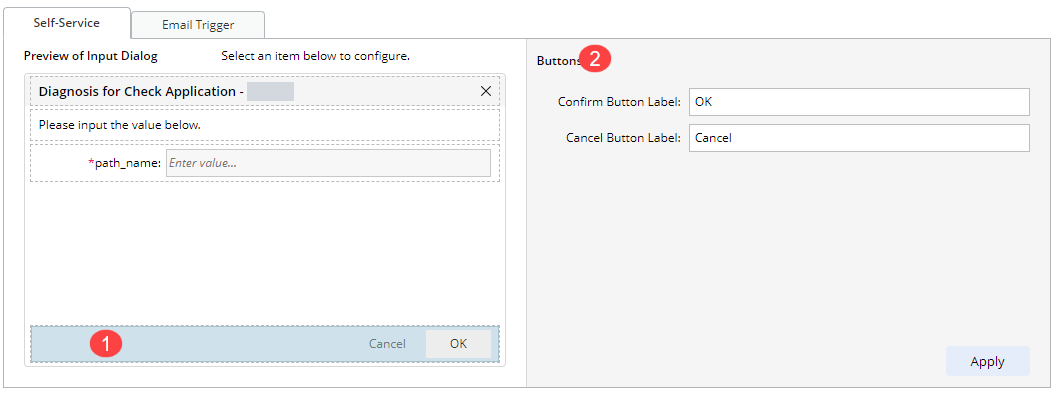
e. Click Save to save the settings.
e. Click Save to save the settings.
The self-service dialog: